Selenium IDE (Integrated Development Environment) is an open source web automation testing tool under the Selenium Suite. Unlike Selenium WebDriver and RC, it does not require any programming logic to write its test scripts rather you can simply record your interactions with the browser to create test cases. Subsequently, you can use the playback option to re-run the test cases.
Perhaps, creating test cases on Selenium IDE does not require any programming language but when you get to use selenese commands like runScript, a little knowledge prior to JavaScript would prove beneficial for you to understand the concepts more clearly.
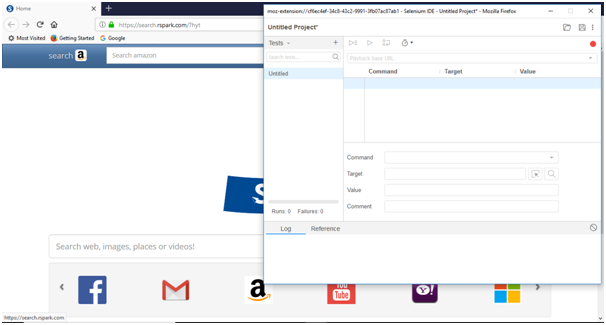
Selenium IDE-Installation
Since, Selenium IDE is available only as Firefox and Chrome plug-in, we assume that you have already installed Mozilla Firefox browser in your system. However, you can download the latest version of Firefox through their official website provided under the link given below.
https://www.mozilla.org/en-US/firefox/new/
- Launch Mozilla Firefox browser.
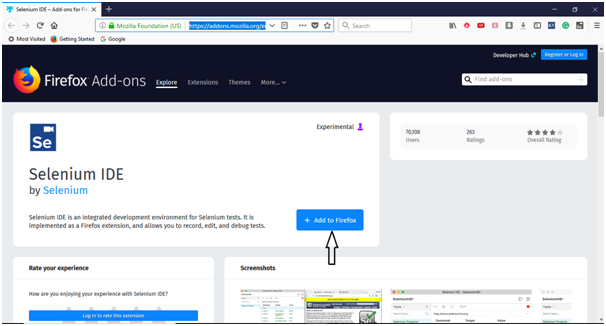
- Open URLhttps://addons.mozilla.org/en-us/firefox/addon/selenium-ide/It will redirect you to the official add-on page of Firefox.
- Click on "Add to Firefox" button.
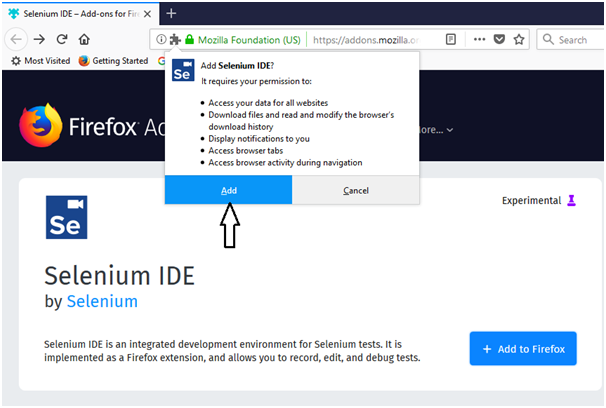
- A pop-up dialog box will be appeared asking you to add Selenium IDE as extension to your Firefox browser.
- Click on "Add" button.
- Restart you Firefox browser.
- Go to the top right corner on your Firefox browser and look for the Selenium IDE icon.
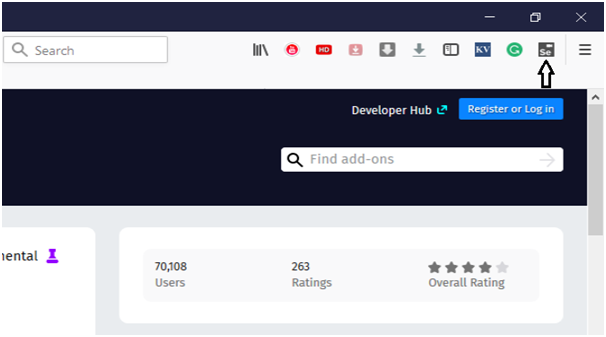
- Click on that icon to launch Selenium IDE.
Selenium IDE-Features
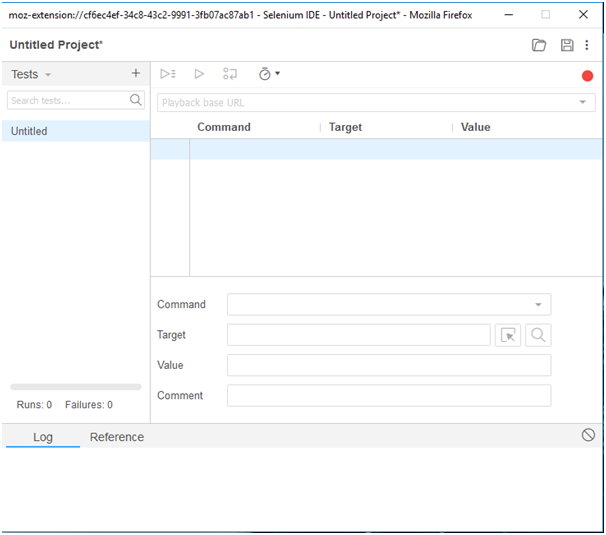
Selenium IDE is divided into different components, each having their own features and functionalities.We have categorized seven different components of Selenium IDE, which includes:
- Menu Bar
- Tool Bar
- Address Bar
- Test Case Pane
- Test Script Editor Box
- Start/Stop Recording Button
- Log, Reference Pane
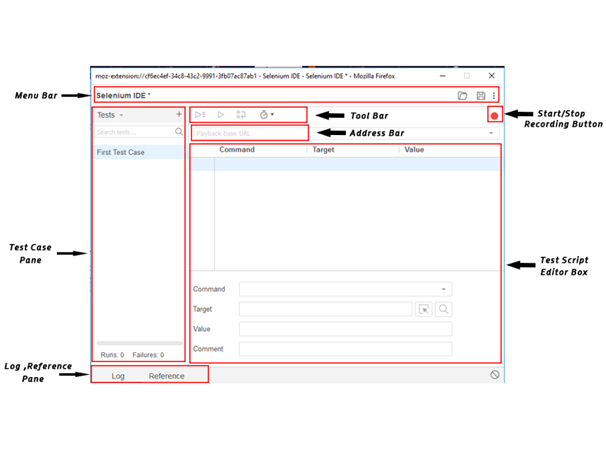
1. Menu Bar
Menu bar is positioned at the top most portion of the Selenium IDE interface. The most commonly used modules of menu bar include:
Project Name
- It allows you to rename your entire project.
- Open Project
It allows you to load any existing project from your personal drives.
- Save Project
It allows you to save the entire project you are currently working on.

2. Tool Bar
The Tool bar contains modules for controlling the execution of your test cases. In addition, it gives you a step feature for debugging you test cases. The most commonly used modules of Tool Bar menu include:
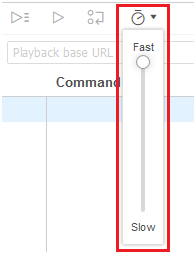
- Speed Control Option
It allows you to control the execution speed of your test cases.
- Step Feature
It allows you to "step" through a test case by running it one command at a time. Use for debugging test cases.

- Run Tests
It allows you to run the currently selected test. When only a single test is loaded "Run Test" button and "Run all" button have the same effect.
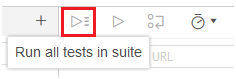
- Run All
It allows you to run the entire test suite when a test suite with multiple test cases is loaded.
3. Address Bar
This module provides you a dropdown menu that remembers all previous values for base URL. In simple words, the base URL address bar remembers the previously visited websites so that the navigation becomes easy later on.

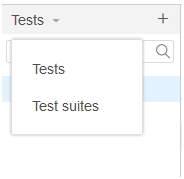
4. Test Case Pane
This module contains all the test cases that are recorded by IDE. In simple words, it provides the list of all recorded test cases at the same time under the test case pane so that user could easily shuffle between the test cases.
At the bottom portion of the Test Case Pane, you can see the test execution result summary which includes the pass/fail status of various test cases.
Test Case Pane also includes features like Navigation panel which allow users to navigate between test cases and test suites.
5. Test Script Editor Box
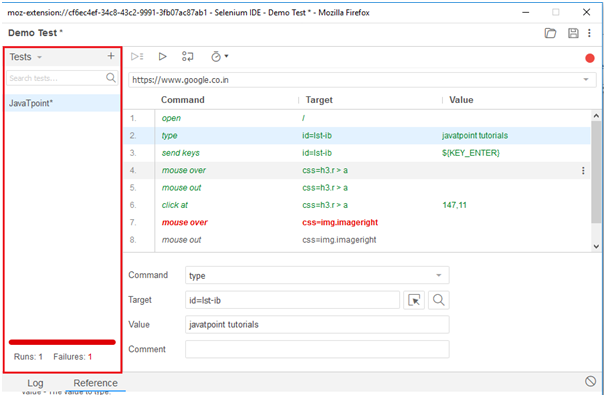
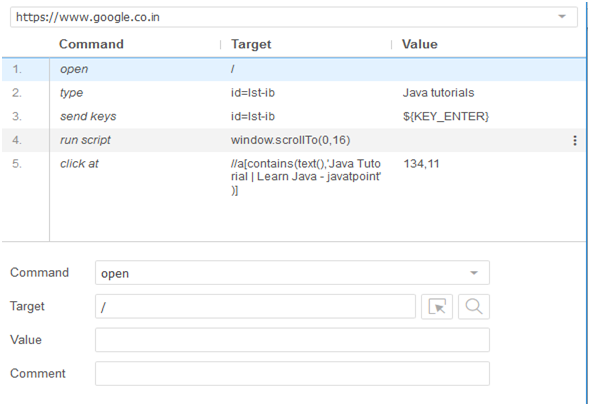
Test Script Editor Box displays all of the test scripts and user interactions that were recorded by the IDE. Each user interaction is displayed in the same order in which they are performed. The Editor box is divided into three columns: Command, Target and Value.
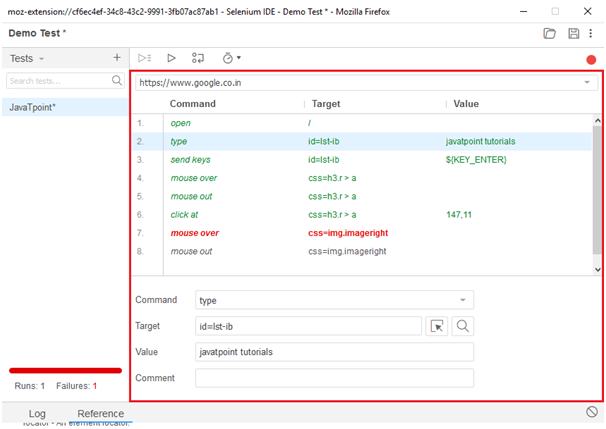
- Command:
Command can be considered as the actual operation/action that is performed on the browser elements. For instance, if you are opening a new URL, the command will be 'open'; if you are clicking on a link or a button on the web page, then the command will be 'clicked'.
- Target:
Target specifies the web element on which the operation has to be performed along with a locator attribute. For instance, if you are clicking on a button called javaTpoint, then the target link will be 'javaTpoint'.
- Value:
Value is treated as an optional field and can be used when we need to send some actual parameters. For instance, if you are entering the email address or password in a textbox, then the value will contain the actual credentials.
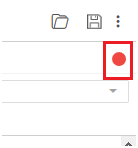
6. Start/Stop Recording Button
Record button records all of the user actions with the browser.
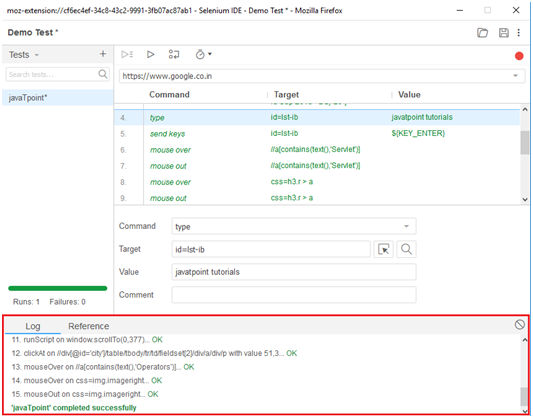
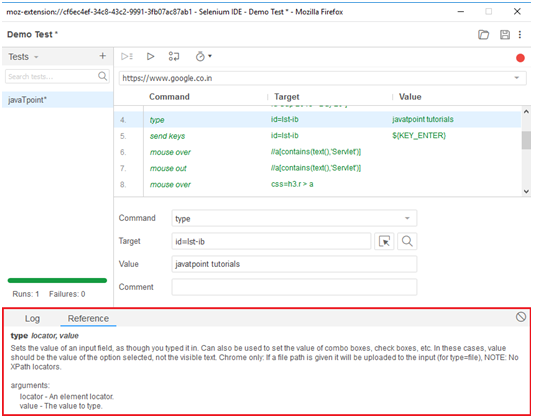
7. Log, Reference Pane
The Log Pane displays the runtime messages during execution. It provides real-time updates of the actions performed by the IDE. It can be categorized into four types: info, error, debug and warn.
The reference Pane displays the complete detail of the currently selected selenese command in the editor.
Selenium IDE- First Test Case
In this section, you will learn how to create a basic test case in Selenium ide.
The entire test script creation process in Selenium IDE can be classified into three steps:
- Recording (recording user interactions with the browser)
- Playing back (executing the recorded script)
- Saving the test suite
Now, we will see the implementation of the above three steps.
1. Recording
- Launch Firefox browser.
- Click on the Selenium icon present on the top right corner on your browser.
- It will launch the default interface of Selenium IDE.
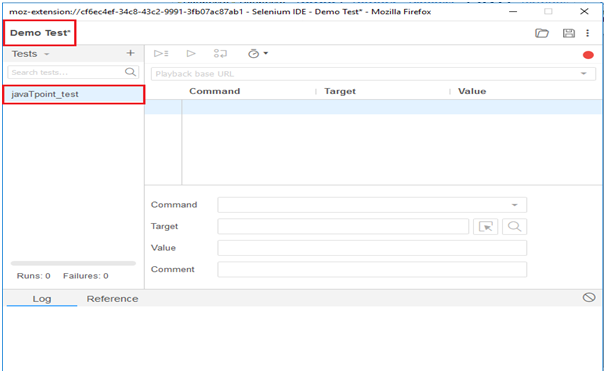
- Rename the project as "Demo Test".
- Rename the test case as "javaTpoint_test".
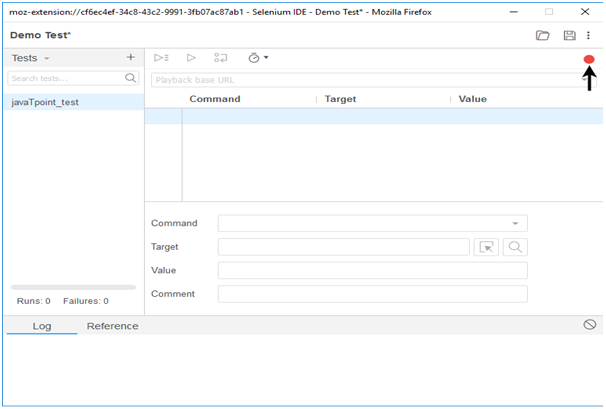
- Click on the "Start Recording" Button present on the top right corner on the IDE to start recording the test case.
- Go to your Firefox browser and open URL:www.google.com
- It will redirect you to the Google search engine page.
- Type "Java Tutorials" in the Google search box.
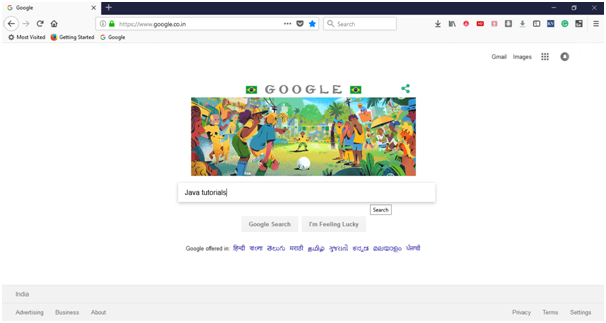
- Hit enter to get the search results.
- Click on the link "Java Tutorial" provided under the URLhttps://www.javatpoint.com/java-tutorial
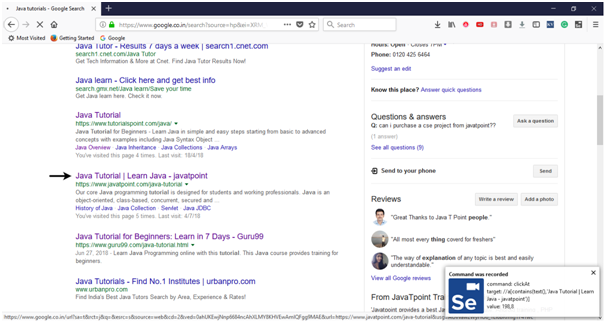
- It will redirect you to the javaTpoint's Java tutorial web page. Meanwhile, you will get the notifications of the actions performed by the IDE at the extreme right corner of your web browser.
- Now, go the IDE and click on the "Stop Recording" button to stop recording your actions further.
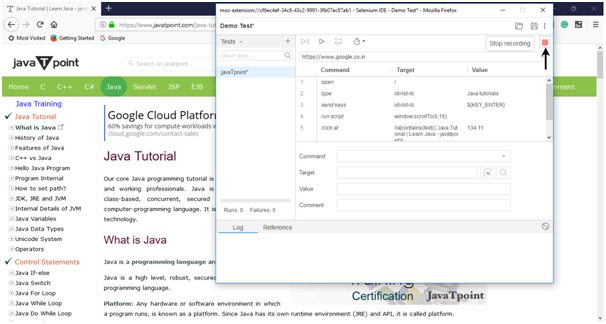
- The Test Editor box now contains the list of all of your interactions with the browser.
Now, we will proceed to the next step which includes executing the recorded script.
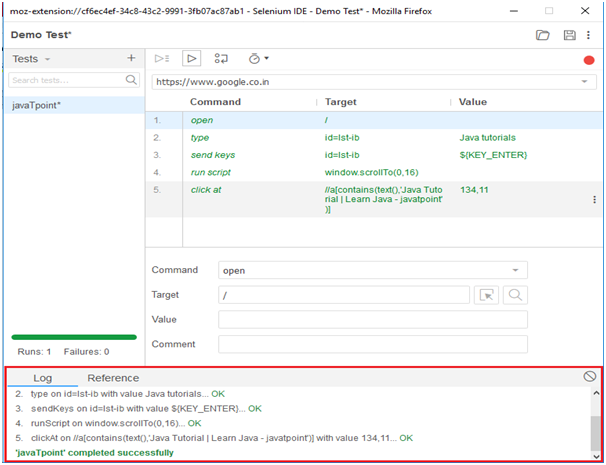
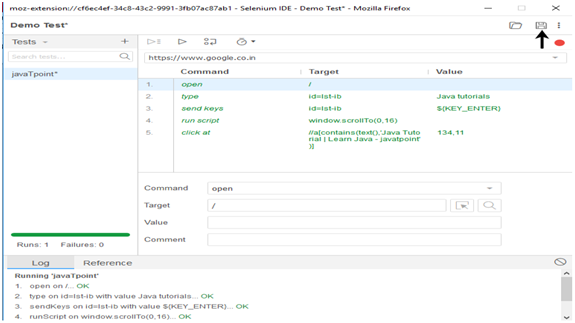
2. Playing Back
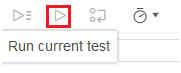
- Click on the "Run Current Test" button present on the tool bar menu of the IDE.
It will execute all of your interactions with the browser and gives you an overall summary of the executed test script.
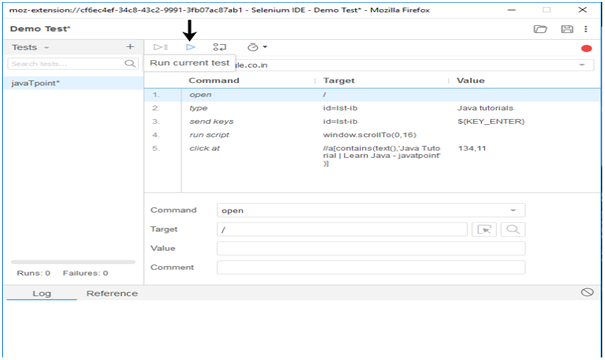
- The Log pane displays the overall summary of the executed test scripts.
3. Saving the test suite
- Click on the save button present on the extreme right corner of the menu bar.
- Save the entire test suite as "Demo Test".
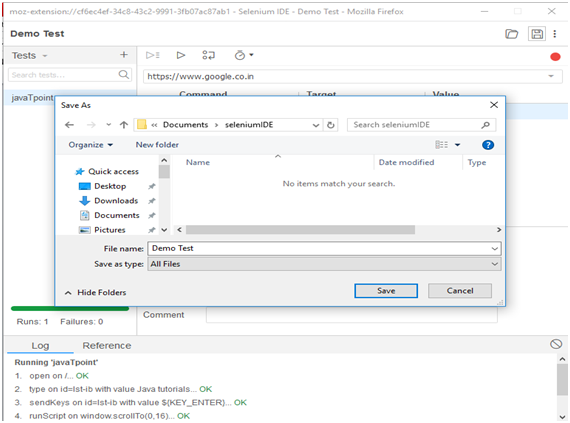
- The test suite can be found at the location provided in the above steps. Notice that the test script is saved in .side format.

Selenium IDE- Login Test
In this section, you will learn how to create a Login Test case in Selenium IDE.
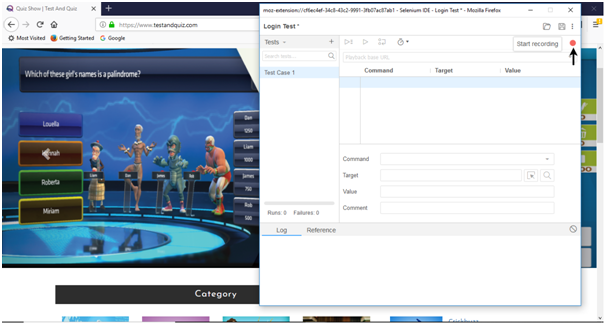
For our test purpose, we will be testing the login page provided by the Test and Quiz website, present under the URL:https://www.testandquiz.com/
The following image shows the snapshot of the home page that will appear when we hit the above mentioned URL.

First you have sign-up to get the login credentials. For this test, we have already generated our login credentials. Now, we will generate a test script to create a Login Test in Selenium IDE.
- Launch Firefox browser.
- Click on the Selenium icon present on the top right corner on your browser.
- It will launch the default interface of Selenium IDE.
- Go to your Firefox browser and open URL:https://www.testandquiz.com/
- Enter the project name as "Login Test".
- Enter the test case name as "Test Case 1".
- Click on the "Start Recording" button to start the recording of the test case.
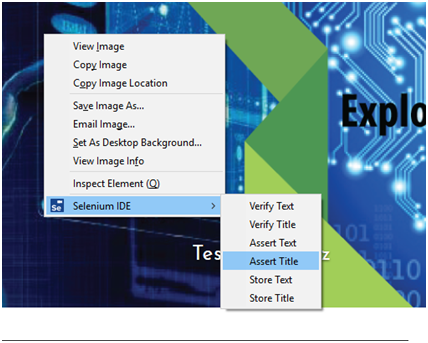
- Go to your Firefox browser and right click on any blank space within the page and select the Selenium IDE option.
- Click on Selenium IDE > Assert Title. The Assert Title command makes sure that the page title is correct.
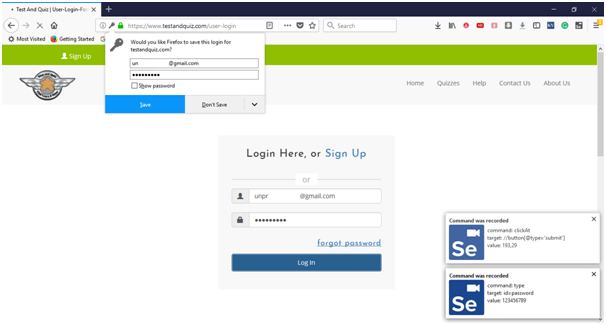
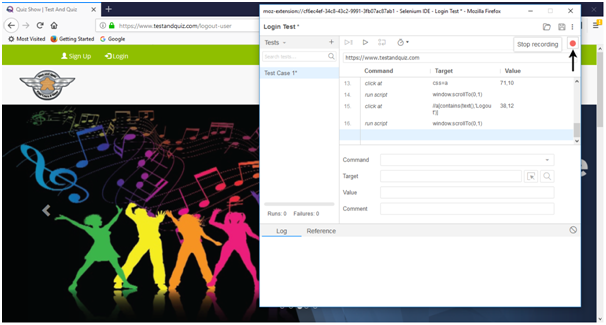
- Now, click on the login button located at the top corner of the website.

- Fill-in the login credentials and click on the login button. Meanwhile you will get the notifications of the actions performed by IDE at the extreme right corner of your browser.
- Once you get logged-in, click on the user name section to view your account details.
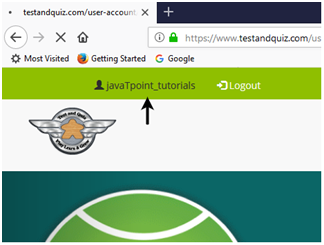
- It will redirect you to your account settings page, where you can edit your personal details.
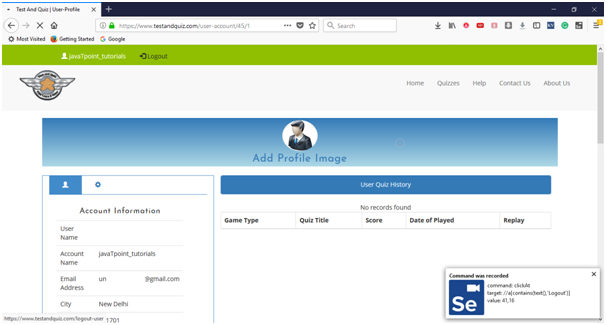
- Click on the Logout button.
- Now, go to the IDE and click on Stop Recording button to stop recording the test case.
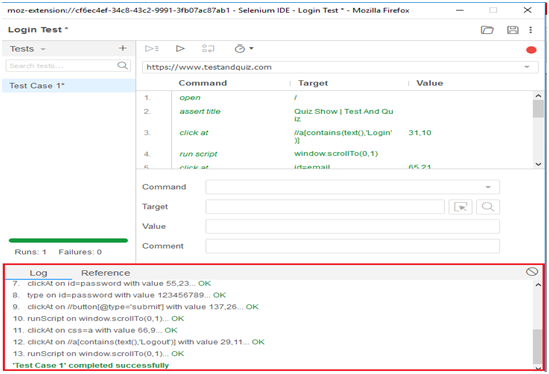
2. Playing Back
- Click on the "Run Current Test" button present on the tool bar menu of the IDE. It will execute all of your interactions with the browser and gives you an overall summary of the executed test script.

- The Log pane displays the overall summary of the executed test scripts.
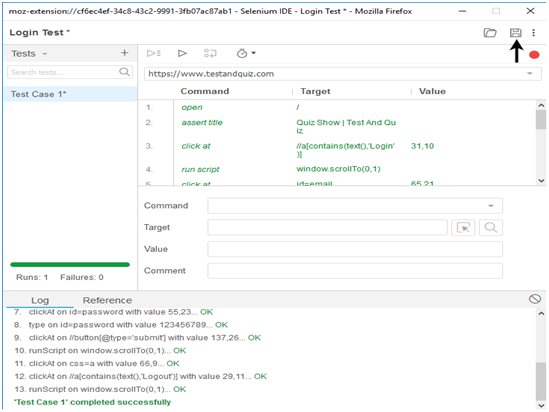
3. Saving the test suite
- Click on the save button present on the extreme right corner of the menu bar.
- Save the entire test suite as "Login Test".
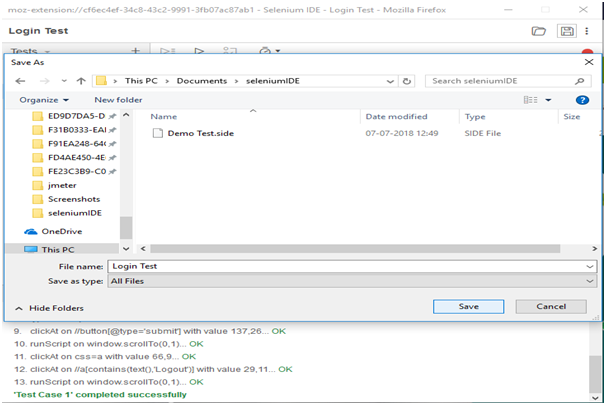
- The test suite can be found at the location provided in the above steps.
Selenium IDE- Commands (Selenese)
- Selenium commands, also known as "Selenese" are the set of commands used in Selenium IDE that run your tests. Using selenese, one can perform activities like:
- Testing the existence of UI elements based on their HTML tags.
- Test for specific content.
- Test for broken links.
- Testing input fields, selection list options, submitting forms and table data among other things.
- Testing of window size, mouse options, alerts, Ajax functionality, pop-up windows, event handling and many other web application features.
A sequence of Selenium commands (Selenese) together is known as test script.
Types of Selenium Commands
Selenium commands are basically classified in three categories:
- Actions
- Accessors
- Assertions
1. Actions
Actions are the selenium commands that generally manipulate the state of the application. Execution of Actions generates events like click this link, select that option, type this box, etc. If an Action fails, or has a bug, the execution of current test is stopped.
Some of the most commonly used Actions commands include:
Command/Syntax Description open (url) It launches the desired URL in the specified browser and it accepts both relative and absolute URLs. type (locator, value) It sets the value of an input field, similar to user typing action. type Keys (locator, value) This command simulates keystroke events on the specified element. click (locator) This command enables clicks on a link, button, checkbox or radio button. click At (locator, coord String) This command enables clicks on an element with the help of locator and co-ordinates double Click (locator) This command enables double clicks on a web element based on the specified element. focus (locator) It moves the focus to the specified element highlight (locator) It changes the background color of the specified element to yellow to highlight is useful for debugging purposes. close() This command simulates the user clicking the "close" button in the title bar of a popup window or tab. store (expression, variable Name) This command specifies the name of a variable in which the result is to be stored and expression is the value to store wait For Condition (script, timeout) This command executes the specified JavaScript snippet repeatedly until it evaluates to "true". 2. Accessors
Accessors are the selenium commands that examine the state of the application and store the results in variables. They are also used to automatically generate Assertions.
Some of the most commonly used Accessors commands include:
Command/Syntax Description store Title (variable Name) This command gets the title of the current page. store Text (locator, variable Name) This command gets the text of an element.. store Value (locator, variable Name) This command gets the (whitespace-trimmed) value of an input field. store Table (table Cell Address, variable Name) This command gets the text from a cell of a table. store Location (variable Name) This command gets the absolute URL of the current page. store Element Index (locator, variable Name) This command gets the relative index of an element to its parent (starting from 0). store Body Text (variable Name) This command gets the entire text of the page. store All Buttons (variable Name) It returns the IDs of all buttons on the page. store All Fields (variable Name) It returns the IDs of all input fields on the page. store All Links (variable Name) It returns the IDs of all links on the page. 2. Assertions
Assertions are the commands that enable testers to verify the state of the application. Assertions are generally used in three modes assert, verify and wait for.
Some of the most commonly used Assertions commands are:
Command/Syntax Description verify Selected(select Locator, option Locator) This command verifies that the selected option of a drop-down satisfies the option Specifier. verify Alert (pattern) This command verifies the alert text; used with accessor store Alert. verify All Buttons (pattern) This command verifies the button which is used with accessor store All Buttons. verify All Links (pattern) This command verifies all links; used with the accessor store All Links. verify Body Text(pattern) This command verifies the body text; used with the accessor store Body Text. verify Attribute (attribute Locator, pattern) This command verifies an attribute of an element; used with the accessor store Attribute. wait For Error On Next (message) This command enables Waits for error; used with the accessor assert Error On Next. wait For Alert (pattern) This command enables waits for the alert; used with the accessor store Alert. verify All Window Ids (pattern) This command verifies the window id; used with the accessor store All Window Ids. - Selenium IDE- Creating Test Cases Manually
In this section, you will learn how to create a test case manually using Selenium commands in Selenium IDE. In simple words, we will create test cases by inserting selenium commands instead of recording option.
For this test, we will search a text operation on any publically available search engine (say "Google"). Subsequently, we will create a Login test case in the same test suite.
To create a test case manually, first you have to go through the most commonly used selenium commands which we have discussed in the previous section. Now, we will create our first test case on search operation. We will search our text on Google search engine.
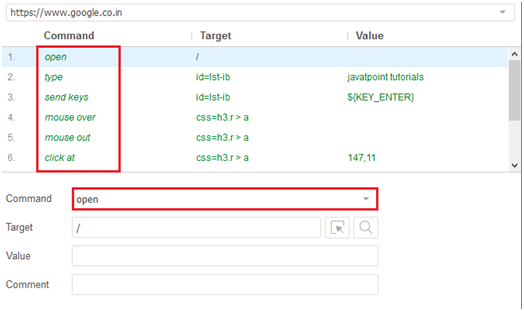
1. Insert Commands
- Launch Firefox browser.
- Click on the Selenium icon present on the top right corner on your browser.
- It will launch the default interface of Selenium IDE.
- Enter the project name as "Manual Test".
- Enter the test case name as "Search Test".
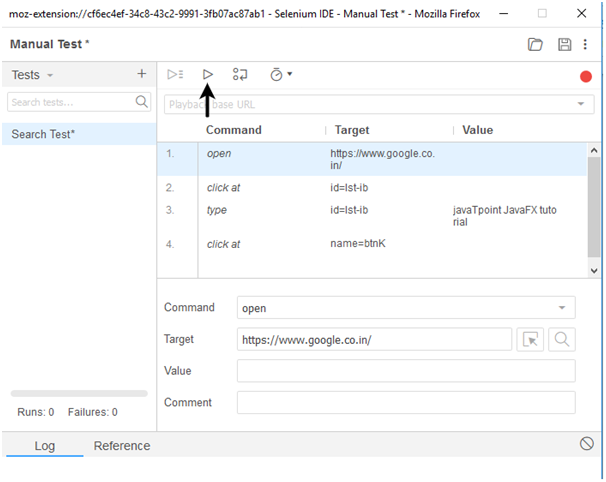
- Click on the command text box present on the Test Script Editor Box.

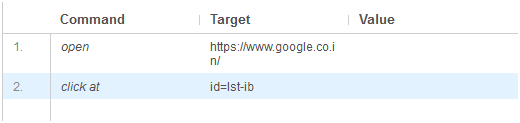
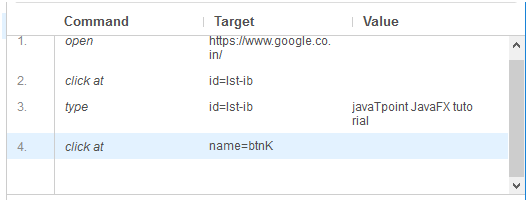
- Modify the properties of First command as:
- Command : open
- Target : https://www.google.co.in
- During execution of the test case, this command will load the Google search engine web page on your Firefox browser.

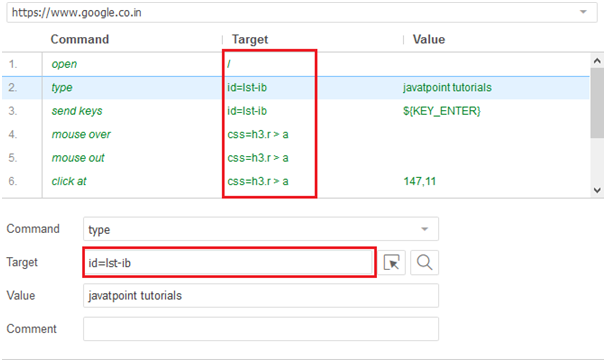
Now, we have to add a command that will click on the Google search engine text box. For this, we need a unique identification element of the text box which will help the IDE to identifythe target location.
The method for finding a unique identification element involves inspection of HTML codes.
- Open URL: https://www.google.co.inyour Firefox browser.
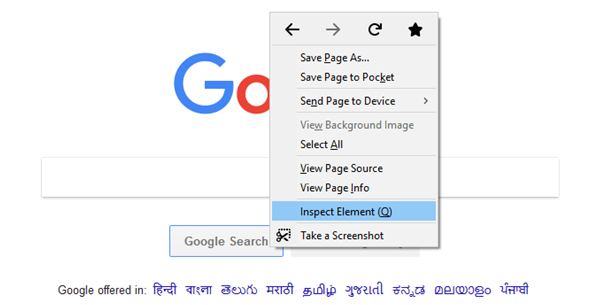
- Right click on the Google search text box and select Inspect Element.
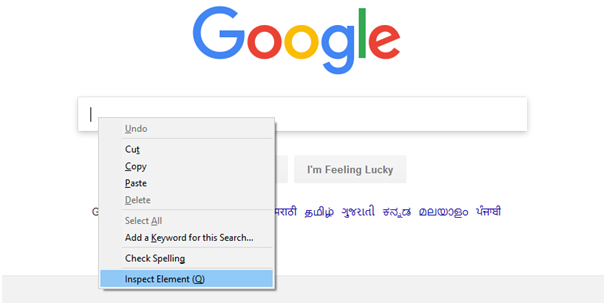
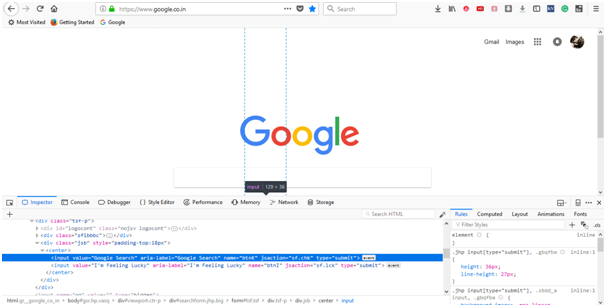
- It will launch a window containing all the specific codes involved in the development of the test box.
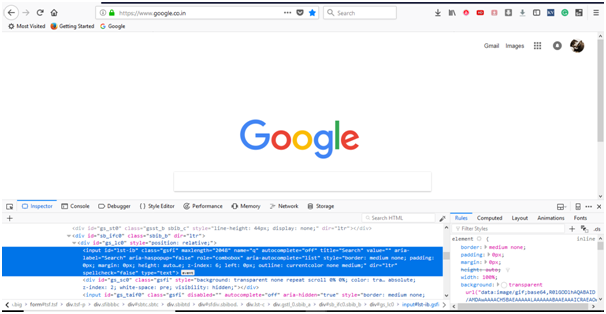
- Pick the input tag element that contains an ID name for the text box.

- Modify the properties of second command as:
- Command :click at
- Target : id=lst-ib
- During execution of the test case, this command will click on the search text box present on the Google search engine web page.
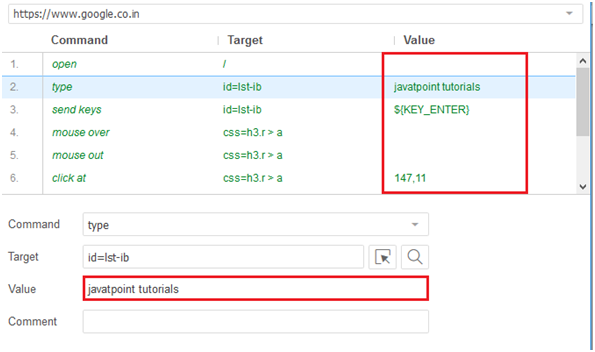
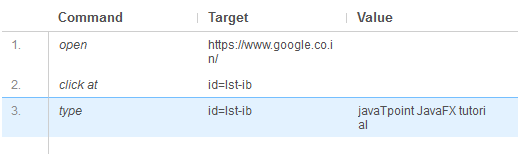
We will use the same identification ID for our third command. The third command will type the specified text in to the Google search text box.
- Modify the properties of third command as:
- Command : type
- Target : id=lst-ib
- Value: javaTpointJavaFX tutorial
- During execution of the test case, this command will type the specified text on the Google search text box.
We will now add a command which will generate a button click event on our web page. For this event to be generated, we need a unique identification element for the Google search button.
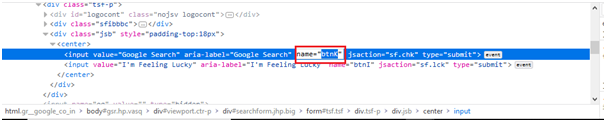
- Right click on the Google search button and select Inspect Element.
- It will launch a window containing all the specific codes involved in the development of the search button.
- Pick the name element that contains the specified name for the Google search button.
- Modify the properties of fourth command as:
- Command : click at
- Target : name=btnK
- During execution of the test case, this command will click on the search button present on the Google search engine web page.
We are now ready to execute our first test script.
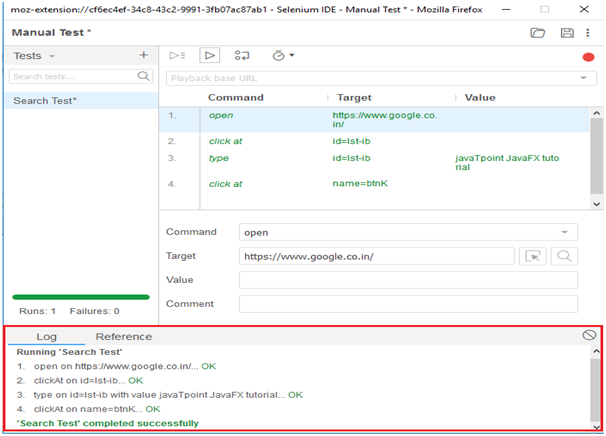
Executing the Test Script
- Click on the "Run Current Test" button present on the tool bar menu of the IDE. It will execute all of your inserted commands on the browser and gives you an overall summary of the executed test script.
- The Log pane displays the overall summary of the executed test scripts.
Now, we will create our second test case within the same test suite.
We will generate a test case based on login feature provided by one of the most popular website "Rediffmail".First you have sign-up to get the login credentials. For this test, we have already generated our login credentials.
1. Insert Commands
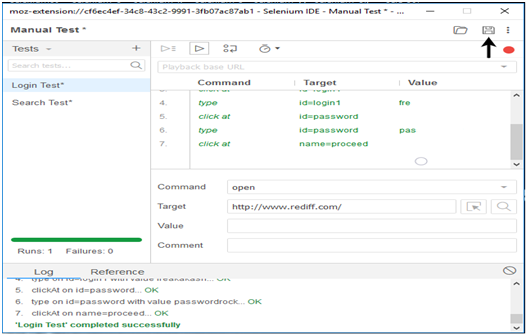
Click on the "Add new test" button at the top of the test case pane.
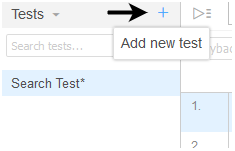
- Rename the test case as "Login Test".
- Click on the command text box present on the Test Script Editor Box.
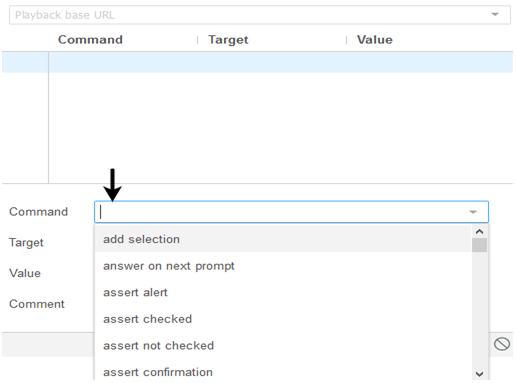
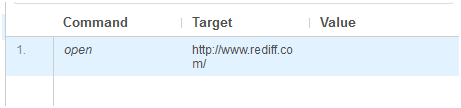
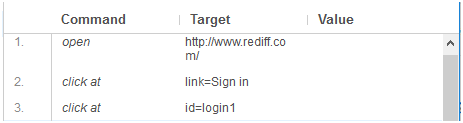
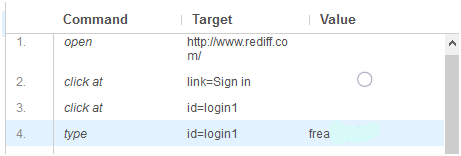
- Modify the properties of First command as:
- Command : open
- Target : http://www.rediff.com/
- During execution of the test case, this command will load the Rediff home page on your Firefox browser.
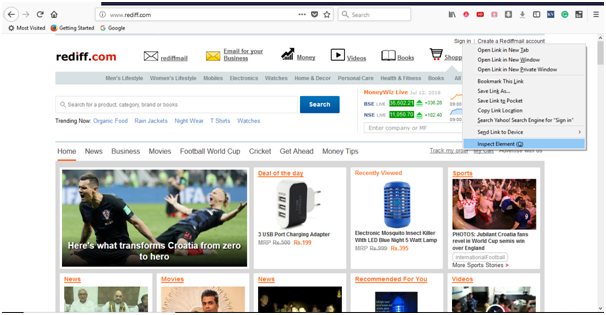
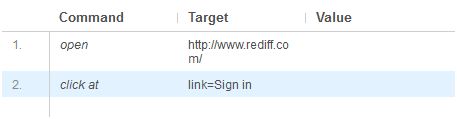
- Open URL:http://www.rediff.com/ on your Firefox browser.
- Right click on the "Sign-in" and select Inspect Element.
- It will launch a window containing all the specific codes involved in the development of the "Sign-in" link.
- Pick the link element that contains the specified name for the "Sign-in" link.
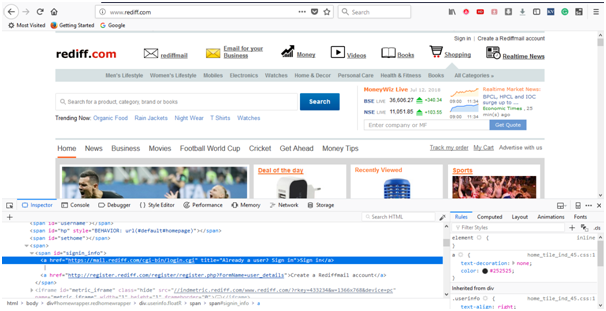
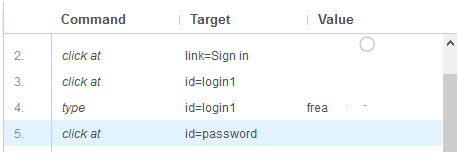
- Modify the properties of second command as:
- Command : click at
- Target : link=Sign in
- During execution of the test case, this command will click on the "Sign in" link.
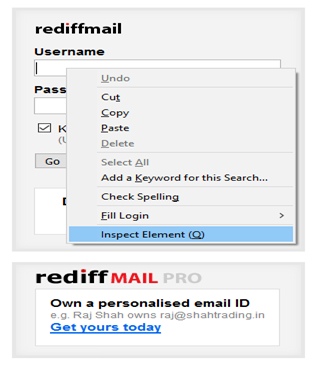
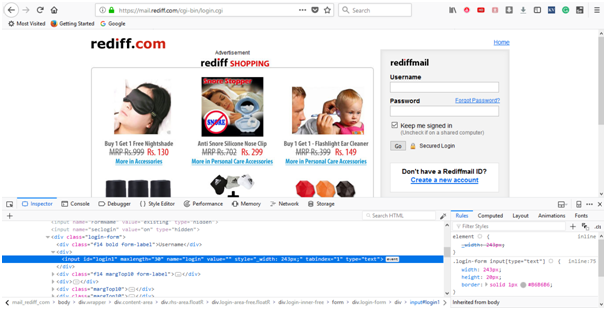
- Right click on the "Username" text box and select Inspect Element.
- It will launch a window containing all the specific codes involved in the development of the "Username" text box.
- Pick the ID element that contains the specific ID for the "Username" text box.
- Modify the properties of third command as:
- Command : click at
- Target : id=login1
- During execution of the test case, this command will click on the "Username" text box.
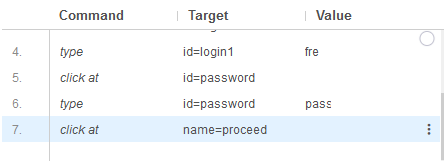
- Modify the properties of fourth command as:
- Command : type.
- Target : id=login1
- Value : frea********* (User Login ID)
- During execution of the test case, this command will type the user id in the "Usename" text box.
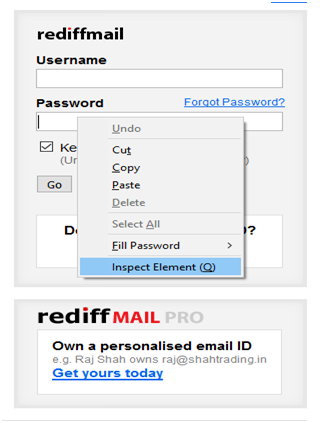
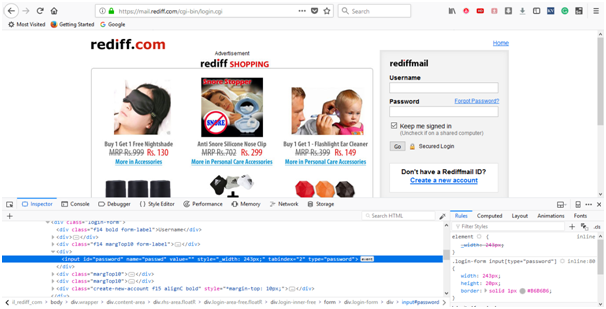
- Right click on the "Password" text box and select Inspect Element.
- It will launch a window containing all the specific codes involved in the development of the "Password" text box.
- Pick the ID element that contains the specific ID for the "Password" text box.
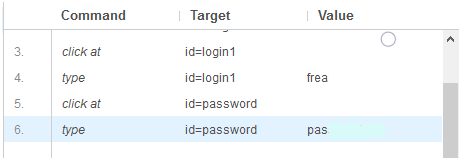
- Modify the properties of fifth command as:
- Command : click at
- Target : id=password
- During execution of the test case, this command will click on the "Username" text box.
- Modify the properties of sixth command as:
- Command : type
- arget : id=password
- Value : **********(User Login Password)
- During execution of the test case, this command will type the user login password in the "Password" text box.
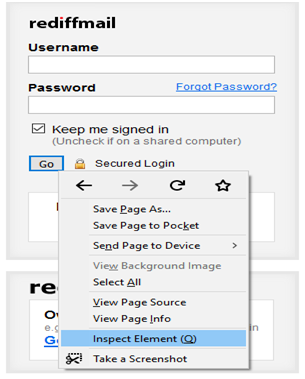
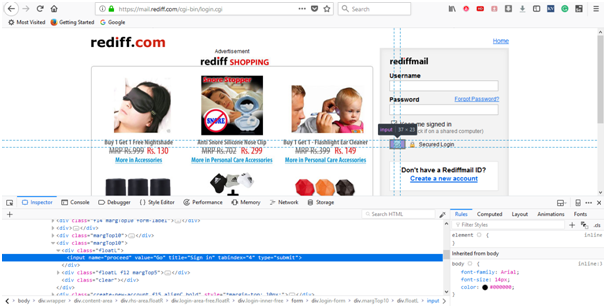
- Right click on the "Go" button and select Inspect Element.
- It will launch a window containing all the specific codes involved in the development of the "Go" submit button.
- Pick the name element that contains the specific name for the "Go" submit button.
- Modify the properties of seventh command as:
- Command : click at
- Target : name=proceed
- During execution of the test case, this command will click on the "Go" submit button.
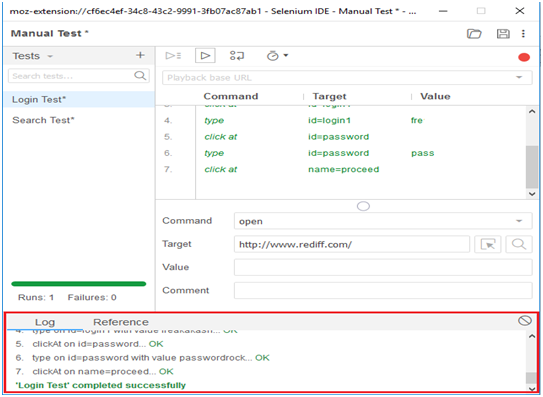
- Click on the "Run Current Test" button present on the tool bar menu of the IDE. It will execute all of your inserted commands on the browser and gives you an overall summary of the executed test script.
- The Log pane displays the overall summary of the executed test scripts.
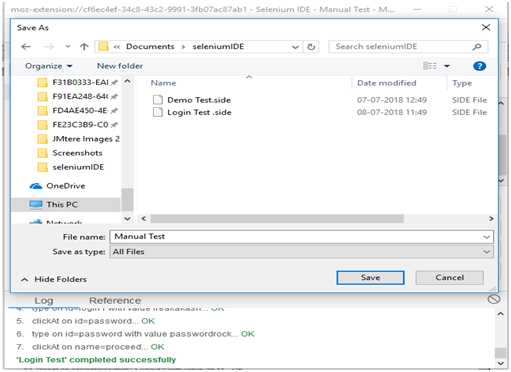
- Click on the save button present on the extreme right corner of the menu bar.
- Save the entire test suite as "Manual Test".
- The test suite can be found at the location provided in the above steps.
Selenium IDE- Locating Strategies
For most of the Selenium commands, we need a target location which uniquely defines the web element in the context of a web application.
A target consists of a locating strategy and has a format like:
In Selenium IDE, a target works on six modes of specifying location of a particular web element which are:
- Locating by Identifier
- Locating by ID Element
- Locating by Name
- Locating by XPath
- Locating by CSS
- Locating by DOM
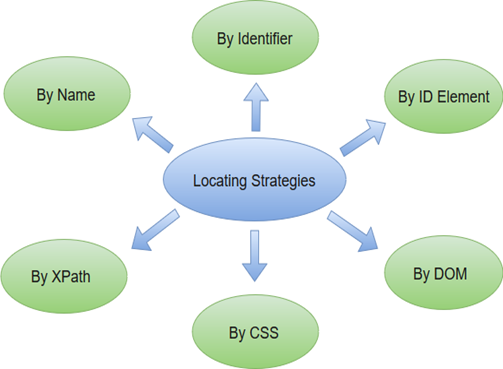
Before proceeding with each mode in detail, you should be well versed with HTML and CSS.
Now, we have to add a command that will click on the "Sign-in" link present at the top right corner of Rediff website. For this, we need a unique identification element of the "Sign-in" link which will help the IDE to identify the target location.
The method for finding a unique identification element involves inspection of HTML codes.

The "Sign in" link will redirect you to the login page. Therefore, for the third command to be entered we need a unique identification for the "Username" text box which will help the IDE to identify the target location.

We will use the same ID element for our next command which involves typing the user-id as login credential.
We will now add a command that will click on the "Password" text box. For this command, we need a unique identification for the "Password" field which will help the IDE to identify the target location.

We will use the same ID element for our next command which involves typing the password as login credential.
At last, we need a unique identification element for the Login Submit button which will help the IDE to identify the target location.

We are now ready to execute our second test script.
Executing the Test Script

Saving the test suite