Selenium WebDriver is the most important component of Selenium Tool's Suite. The latest release "Selenium 2.0" is integrated with WebDriver API which provides a simpler and more concise programming interface.
The following image will give you a fair understanding of Selenium components and the Test Automation Tools.
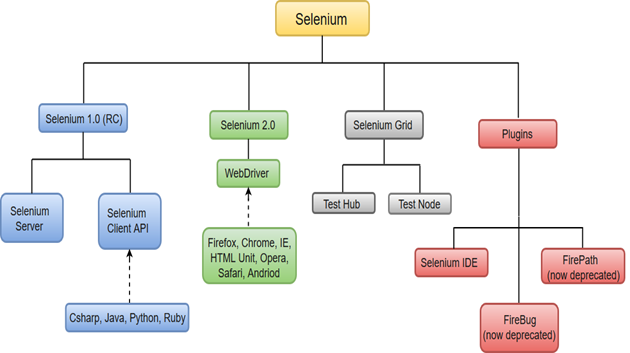
Selenium WebDriver was first introduced as a part of Selenium v2.0. The initial version of Selenium i.e Selenium v1 consisted of only IDE, RC and Grid. However, with the release of Selenium v3, RC has been deprecated and moved to legacy package.
In WebDriver, test scripts can be developed using any of the supported programming languages and can be run directly in most modern web browsers. Languages supported by WebDriver include C#, Java, Perl, PHP, Python and Ruby.
Before learning the concepts of Selenium WebDriver, you should be well versed with any of the supported programming languages. Currently, Selenium Web driver is most popular with Java and C#. For this tutorial, we are using Selenium with java. You can refer to the links given below to learn basic as well as advance concepts of Java and C#:
Java Tutorial: https://www.javatpoint.com/java-tutorial
C# Tutorial: https://www.javatpoint.com/c-sharp-tutorial
Selenium WebDriver performs much faster as compared to Selenium RC because it makes direct calls to the web browsers. RC on the other hand needs an RC server to interact with the browser.
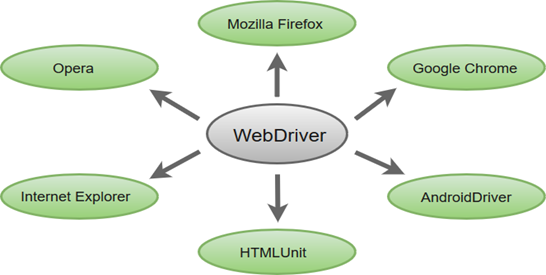
WebDriver has a built-in implementation of Firefox driver (Gecko Driver). For other browsers, you need to plug-in their browser specific drivers to communicate and run the test. Most commonly used WebDriver's include:
- Google Chrome Driver
- Internet Explorer Driver
- Opera Driver
- Safari Driver
- HTML Unit Driver (a special headless driver)
Selenium WebDriver- Architecture
Selenium WebDriver API provides communication facility between languages and browsers.
The following image shows the architectural representation of Selenium WebDriver.
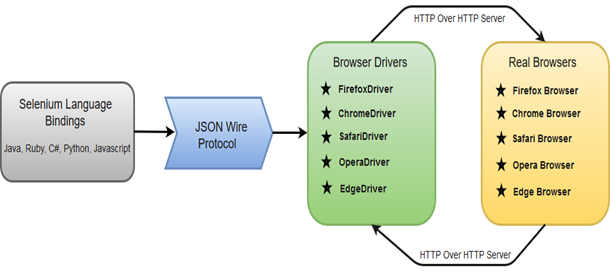
There are four basic components of WebDriver Architecture:
- Selenium Language Bindings
- JSON Wire Protocol
- Browser Drivers
- Real Browsers
Selenium Language Bindings / Selenium Client Libraries
Selenium developers have built language bindings/Selenium Client Libraries in order to support multiple languages. For instance, if you want to use the browser driver in java, use the java bindings. All the supported language bindings can be downloaded from the official website (https://www.seleniumhq.org/download/#client-drivers) of Selenium.
JSON Wire Protocol
JSON (JavaScript Object Notation) is an open standard for exchanging data on web. It supports data structures like object and array. So, it is easy to write and read data from JSON. To learn more about JSON, visit https://www.javatpoint.com/json-tutorial
JSON Wire Protocol provides a transport mechanism to transfer data between a server and a client. JSON Wire Protocol serves as an industry standard for various REST web services. To learn more about Web Services, visit https://www.javatpoint.com/web-services-tutorial
Browser Drivers
Selenium uses drivers, specific to each browser in order to establish a secure connection with the browser without revealing the internal logic of browser's functionality. The browser driver is also specific to the language used for automation such as Java, C#, etc.
When we execute a test script using WebDriver, the following operations are performed internally.
- HTTP request is generated and sent to the browser driver for each Selenium command.
- The driver receives the HTTP request through HTTP server.
- HTTP Server decides all the steps to perform instructions which are executed on browser.
- Execution status is sent back to HTTP Server which is subsequently sent back to automation script.
Browsers
Browsers supported by Selenium WebDriver:
- Internet Explorer
- Mozilla Firefox
- Google Chrome
- Safari
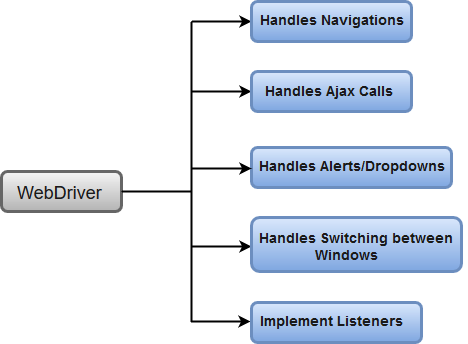
Selenium WebDriver- Features
Some of the most important features of Selenium WebDriver are:
- Multiple Browser Support: Selenium WebDriver supports a diverse range of web browsers such as Firefox, Chrome, Internet Explorer, Opera and many more. It also supports some of the non-conventional or rare browsers like HTMLUnit.
- Multiple Languages Support: WebDriver also supports most of the commonly used programming languages like Java, C#, JavaScript, PHP, Ruby, Pearl and Python. Thus, the user can choose any one of the supported programming language based on his/her competency and start building the test scripts.
- Speed: WebDriver performs faster as compared to other tools of Selenium Suite. Unlike RC, it doesn't require any intermediate server to communicate with the browser; rather the tool directly communicates with the browser.

- Simple Commands: Most of the commands used in Selenium WebDriver are easy to implement. For instance, to launch a browser in WebDriver following commands are used:
WebDriver driver = new Firefox Driver(); (Firefox browser )
WebDriver driver = new Chrome Driver(); (Chrome browser)
WebDriver driver = new Internet Explorer Driver(); (Internet Explorer browser) - WebDriver- Methods and Classes: WebDriver provides multiple solutions to cope with some potential challenges in automation testing.
WebDriver also allows testers to deal with complex types of web elements such as checkboxes, dropdowns and alerts through dynamic finders.
Selenium WebDriver Vs Selenium RC
Selenium RC had a lot of limitations which eventually led to the development of Selenium WebDriver.
See the major differences between Selenium RC and Selenium WebDriver:
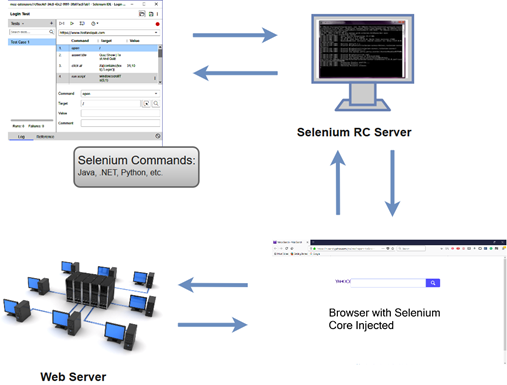
1. Architecture
The architecture of Selenium RC is complicated because it uses an intermediate RC Server to communicate with the browser. The RC Server is installed initially before running the test scripts and acts as mediator between your Selenium commands and your browser.
When we execute a test script in Selenium RC, the following operations are performed internally.
- The server injects a JavaScript program known as Selenium Core into the browser.
- Subsequently, Selenium Core will start receiving the instructions (Selenium commands) from the RC Server.
- When all the instructions are received, Selenium Core will execute them as JavaScript commands.
- These JavaScript commands act as instructions to the browser.
- The browser will execute all of the instructions provided by Selenium Core and returns an overall summary to the Server. This overall summary acts as the final result which is displayed on the user screen.
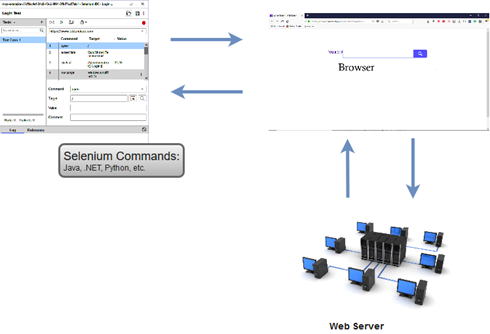
The architecture of Selenium WebDriver is simpler as compared to Selenium RC.
The browser is controlled directly from OS (Operating System) level. The basic requirements to run a test script on WebDriver are:
- An IDE (Integrated Development Environment) with any of the supported programming language like Java, C#, etc.
- A Browser to execute the instructions generated by the test script.
2. Speed
Selenium WebDriver performs faster than Selenium RC because it interacts directly with the browser without using any external proxy server. Selenium RC, on the other hand uses an intermediate RC Server to communicate with the browser.
Execution of test scripts takes more time in Selenium RC than WebDriver, since it uses JavaScript commands as instructions to the browser.
3. Object Oriented
Selenium WebDriver is purely object oriented API, whereas Selenium RC is less object oriented API.
WebDriver is entirely based on object oriented programming languages like Java, C#, etc.
4. Testing Mobile Applications
Selenium WebDriver supports OS (Operating System) for mobile applications like iOS, windows mobile and android. On the other hand, Selenium RC doesn't support testing of mobile applications.
5. Browser Support
Selenium WebDriver also supports headless HTML Unit browser (Invisible Browser).
Selenium RC doesn't support the headless HTML Unit browser as it needs a real browser to work with.
Selenium WebDriver- Installation
Selenium WebDriver installation process is completed in four basic steps:
- Download and Install Java 8 or higher version.
- Download and configure Eclipse or any Java IDE of your choice.
- Download Selenium WebDriver Java Client
- Configure Selenium WebDriver
1. Download and Install Java
We assume that you have already installed Java 8 or above on your machine and successfully configured the environment variables required to run and compile java programs.
Note: you'll need to have Java 8 installed to use Selenium 3.
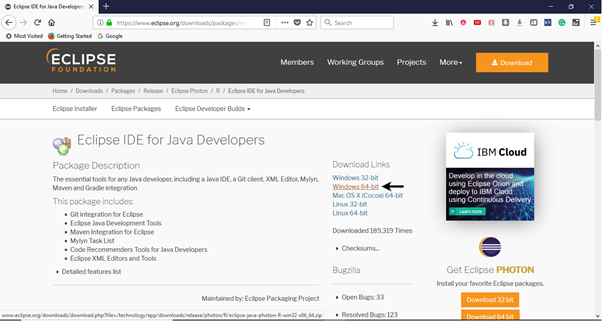
- Open URL: https://www.eclipse.org/downloads/ .
- Click on the "Download Packages" link (you can also download the IDE directly from the "downloads page" of Eclipse official website, but we will recommend you to navigate through the download packages section and get "Eclipse IDE for Java Developers").
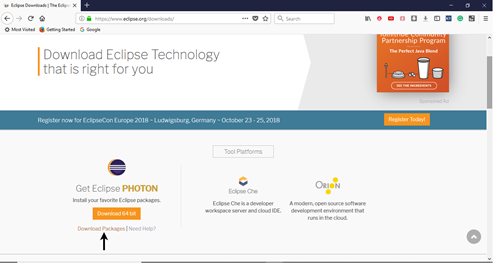
- It will redirect you to the "Download Packages" section. Scroll down through the webpage and click on "Eclipse IDE for Java Developers".
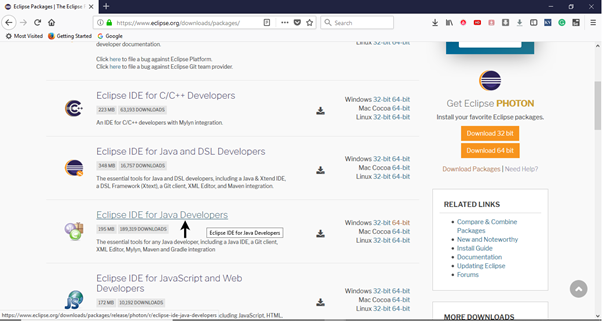
- Go to the Download Links section and click on "Windows 64-bit". You can also select other options to download based on the operating system you are currently working on.
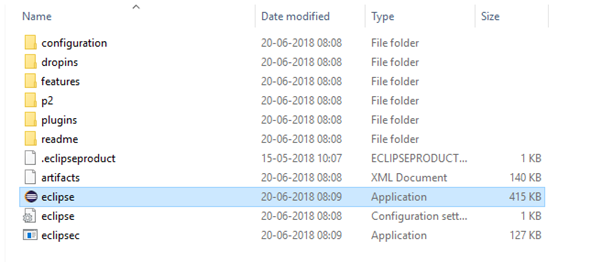
- The downloaded file would be in zipped format. Unpack the contents in a convenient directory.

- Double click on "eclipse" (.exe file).
- To configure the workspace, select a convenient directory where you want to keep all of your Selenium trails and click on Launch button.

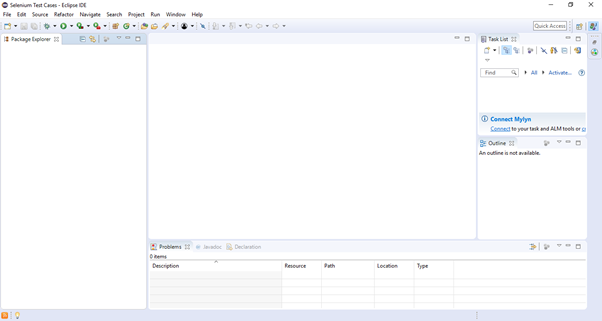
- It will launch the default interface of Eclipse IDE.
3. Download Selenium WebDriver Java Client
- Open URL: https://docs.seleniumhq.org/download/
It will redirect you to the "downloads page" of Selenium official website. - Scroll down through the web page and locate Selenium Client & WebDriver Language Bindings.
- Click on the "Download" link of Java Client Driver as shown in the image given below.
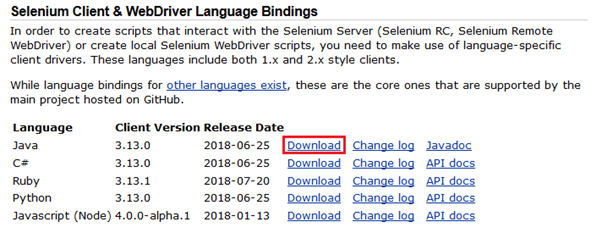
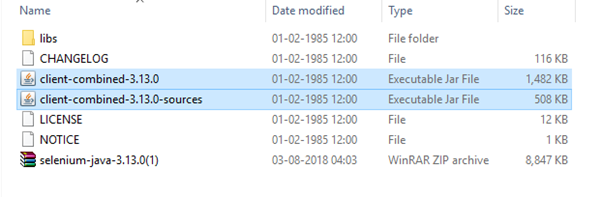
- The downloaded file would be in zipped format. Unpack the contents in a convenient directory. It contains the essential jar files required to configure Selenium WebDriver in Eclipse IDE.
4. Configure Selenium WebDriver
Now we will configure our Eclipse IDE with Selenium WebDriver. In simple terms, we will create a new Java Project in Eclipse and load all the essential jar files in order to create Selenium Test Scripts.
- Launch Eclipse IDE
- Create a new Java Project from File > New > Java Project.

- Give your Project name as "Demo_Test", leave the other fields unaltered and click on "Finish" button.
- It will create a new Java project with the following directories.
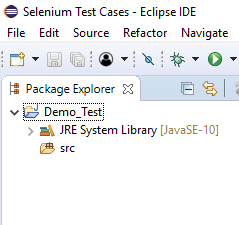
Note: Selenium Test Scripts are always written in ".class" file in Java. Here the project "Demo_Test" act as a Test Suite that may contain one or more Selenium test cases/test scripts.
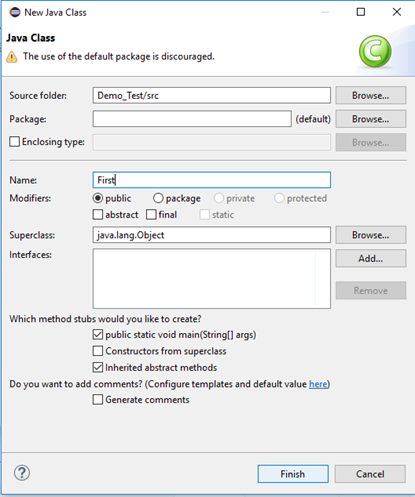
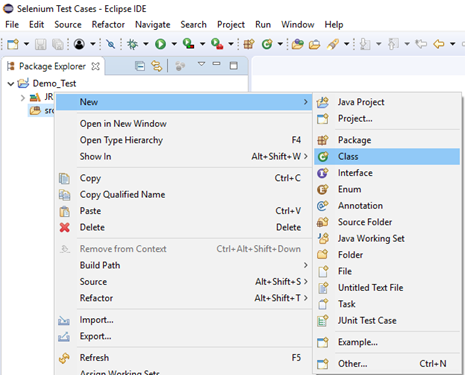
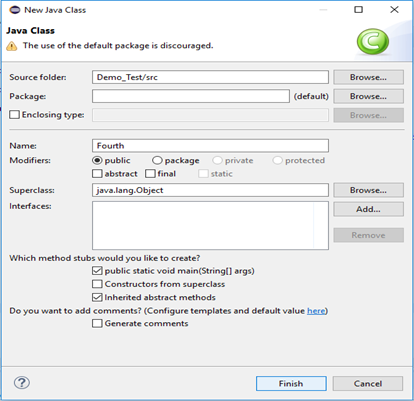
- Right click on the "src" folder and create a new Class File from New > Class.

- Give your Class name as "First" and click on "Finish" button.
Now, we will add the Selenium jar files in our Test Suite (Demo_Test).
- Right click on "Demo_Test" folder and select Properties.
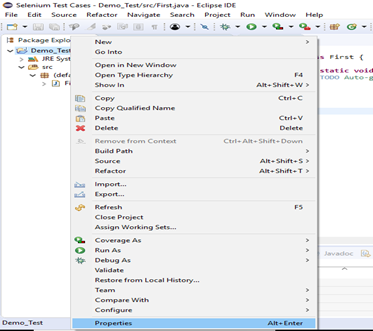
- It will launch the Properties window for our "Demo_Test" Test Suite.
- Click on "Java Build Path" option from the left hand side panel.
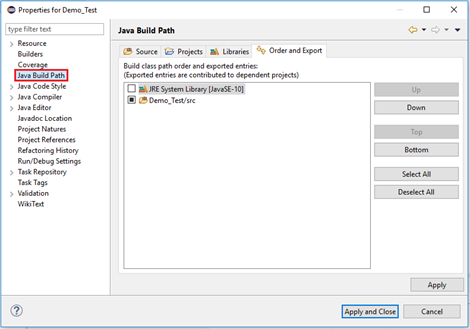
- Switch to Libraries tab and click on "Add External JARs" button.
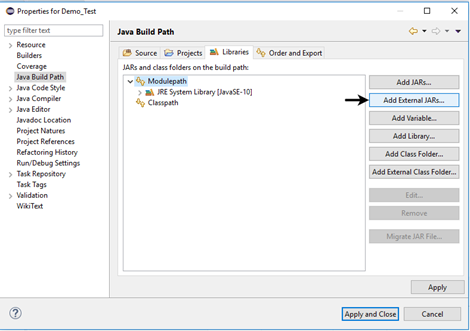
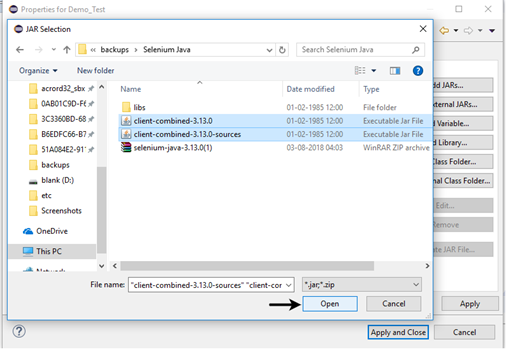
- Locate the directory where you have downloaded the Selenium jar files, select the respective jars and click on "Open" button.
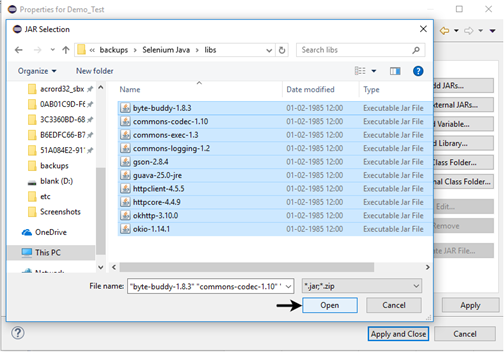
- Repeat the same steps for the jars which are present under the "libs" folder.
- Open "libs" folder, select all of the respective jar files and click on "Open" button.
- Once you get all the Selenium jar files in your Libraries tab, click on Apply and Close button.
- The following image shows the directory structure of our "Demo_Test" test suite after adding Selenium jars.
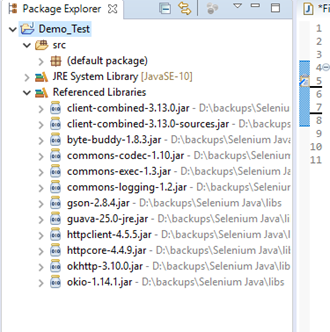
Hence, we have successfully configured Selenium WebDriver with Eclipse IDE. Now, we are ready to write our test scripts in Eclipse and run it in WebDriver.
Selenium WebDriver- First Test Case
In this section, you will learn how to create your First Selenium Automation Test Script.
Under this test, we will automate the following scenarios:
- Invoke Google Chrome browser.
- Open URL: www.google.com
- Click on the Google Search text box.
- Type the value "java t point tutorials"
- Click on the Search button.
We will create our test case step by step to give you a complete understanding of each component in detail.
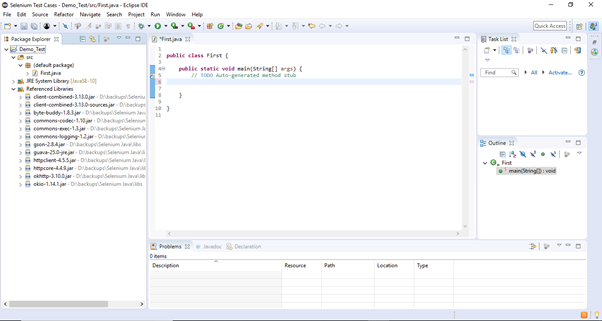
Step1. Launch Eclipse IDE and open project "Demo_Test" which we have created in the previous section (Configure Selenium WebDriver) of this Tutorial. We will write our first Selenium test script in the "First.class" file under the "Demo_Test" test suite.
Note: To invoke a browser in Selenium, we have to download an executable file specific to that browser. For example, Chrome browser implements the WebDriver protocol using an executable called ChromeDriver.exe. These executable files start a server on your system which in turn is responsible for running your test scripts in Selenium.
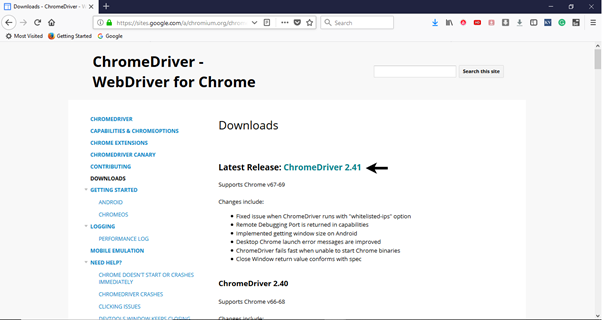
Step2. Open URL: https://sites.google.com/a/chromium.org/chromedriver/downloads in your browser.
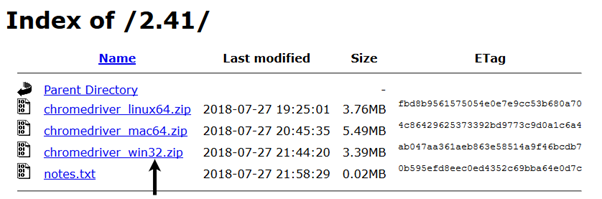
Step3. Click on the "ChromeDriver 2.41" link. It will redirect you to the directory of ChromeDriver executables files. Download as per the operating system you are currently on.
For windows, click on the "chromedriver_win32.zip" download.
The downloaded file would be in zipped format. Unpack the contents in a convenient directory.

Note: Selenium developers have defined properties for each browser that needs the location of the respective executable files to be parsed in order to invoke a browser. For example, the property defined for Chrome browser - webdriver.chrome.driver, needs the path of its executable file - D:\ChromeDriver\chromedriver.exe in order to launch chrome browser.

Step4. We would need a unique identification for the web elements like Google Search text box and Search button in order to automate them through our test script. These unique identifications are configured along with some Commands/Syntax to form Locators. Locators help us to locate and identify a particular web element in context of a web application.
The method for finding a unique identification element involves inspection of HTML codes.
- Open URL: https://www.google.com in your Chrome browser.
- Right click on the Google search text box and select Inspect Element.
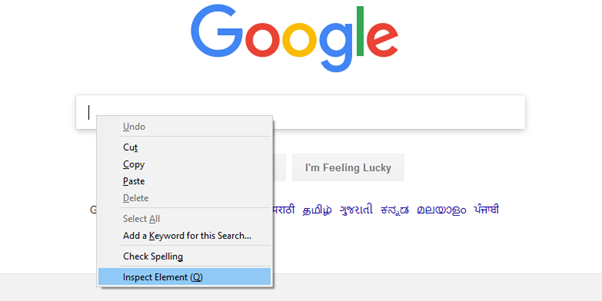
- It will launch a window containing all the specific codes involved in the development of the test box.
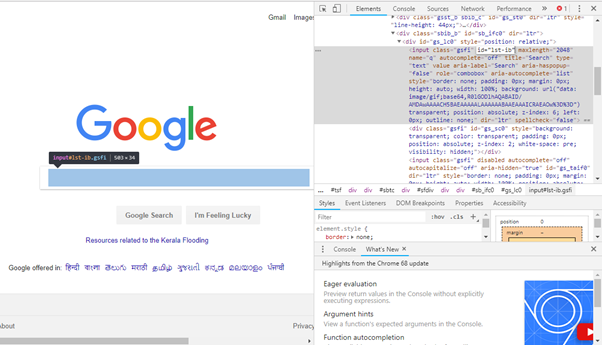
- Pick the value of id element i.e. "lst-ib".

- Given below is the Java syntax for locating elements through "id" in Selenium WebDriver.
- driver.findElement(By.id (<element ID>))
- Here is the complete code for locating Google Search text box in our test script.
- driver.findElement(By.id ("lst-ib"))
- Now, right click on the Google Search button and select Inspect Element.
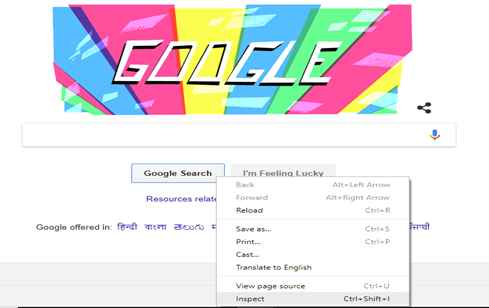
- It will launch a window containing all the specific codes involved in the development of the Google Search button.
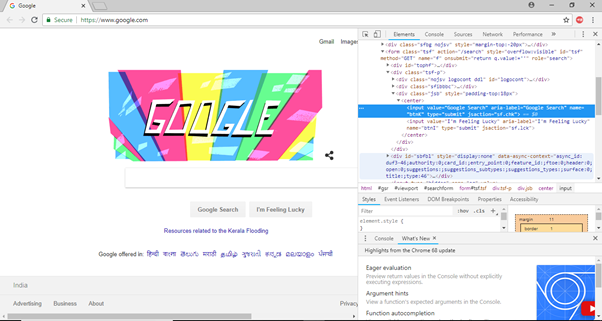
- Pick the value of name element i.e. "btnK".

- Given below is the Java syntax for locating elements through "name" in Selenium WebDriver.
- driver.findElement(By.name (<element name>))
- Here is the complete code for locating Google Search button in our test script.
- driver.findElement(By.name ("btnK"))
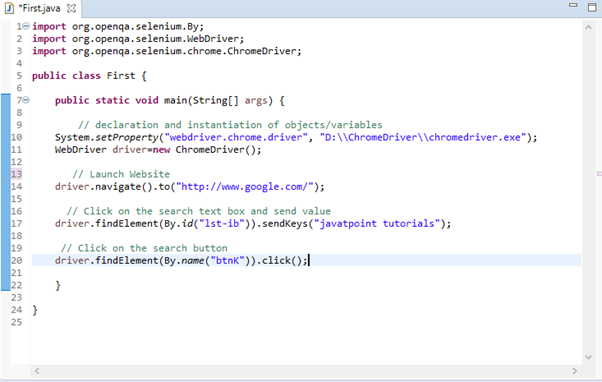
Step5. Now it is time to code. We have embedded comments for each block of code to explain the steps clearly.
- import org.openqa.selenium.By;
- import org.openqa.selenium.WebDriver;
- import org.openqa.selenium.chrome.ChromeDriver;
-
- public class First {
-
- public static void main(String[] args) {
-
-
- System.setProperty("webdriver.chrome.driver", "D:\\ChromeDriver\\chromedriver.exe");
- WebDriver driver=new ChromeDriver();
-
-
- driver.navigate().to("http://www.google.com/");
-
-
- driver.findElement(By.id("lst-ib")).sendKeys("javatpoint tutorials");
-
-
- driver.findElement(By.name("btnK")).click();
-
- }
-
- }
The Eclipse code window will look like this:
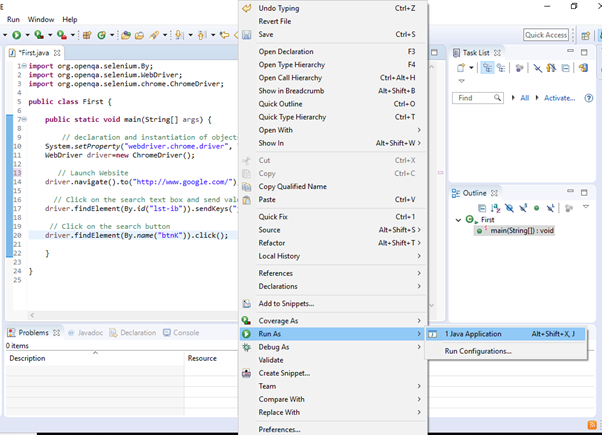
Step6. Right click on the Eclipse code and select Run As > Java Application.
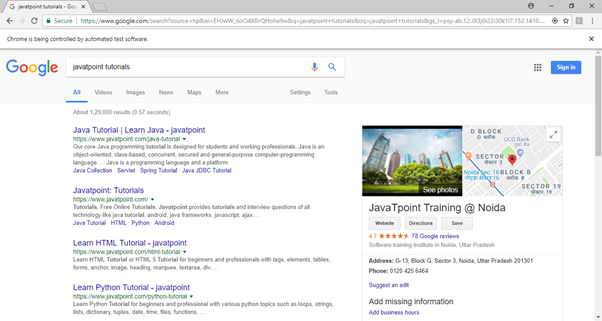
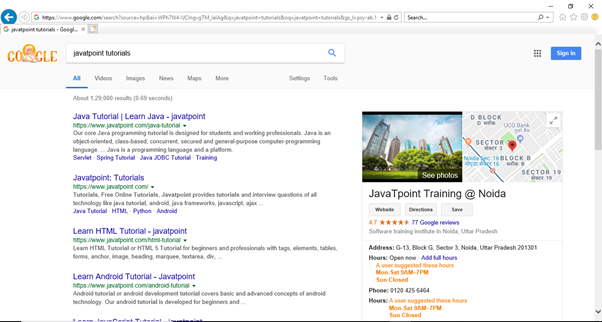
Step7. The output of above test script would be displayed in Google Chrome browser.
Explanation of the Code
Import Packages/Statements
In java, import statements are used to import the classes present in another packages. In simple words, import keyword is used to import built-in and user-defined packages into your java source file.
- org.openqa.selenium.WebDriver - References the WebDriver interface which is required to instantiate a new web browser.
- org.openqa.selenium.chrome.ChromeDriver - References the ChromeDriver class that is required to instantiate a Chrome-specific driver onto the browser instantiated by the WebDriver class.
Instantiating objects and variables
A driver object is instantiated through:
WebDriver driver=new ChromeDriver();
Launch Website
To launch a new website, we use navigate().to() method in WebDriver.
driver.navigate().to("http://www.google.com/");
Click on an element
In WebDriver, user interactions are performed through the use of Locators which we would discuss in later sessions of this tutorial. For now, following instance of code is used to locate and parse values in a specific web element.
driver.findElement(By.id("lst-ib")).sendKeys("javatpoint tutorials");
Selenium WebDriver- Commands
As we have discussed earlier in the IDE section, Selenium commands are the set of commands that are used to run our Selenium tests.
In Selenium WebDriver, we have an entirely different set of commands for performing different operations. Since we are using Selenium WebDriver with Java, commands are simply methods written in Java language.
Note: A java method is a collection of statements that are grouped together to perform a specific operation.
Before getting into the details of commands provided by Selenium WebDriver, we insist you to go through the Java OOPs (Object-Oriented Programming) concepts in java programming language. You can also refer to our Java OOPs concepts section provided in the Java Tutorial.
Now, the question arises is that how can we access methods provided by WebDriver.
Till now, we have successfully created our first test script in Selenium WebDriver. Therefore, one possible way to view the methods provided by WebDriver is to open the Eclipse IDE loaded with Selenium Webdriver jar files, create a driver object for WebDriver and press the dot key. It will show you all of the possible methods provided by WebDriver.
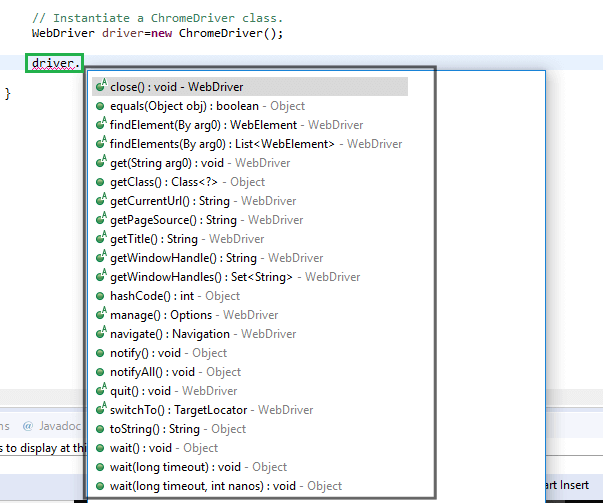
Let us consider an example form the suggestions displayed by Eclipse to understand the syntax of the methods provided by WebDriver.
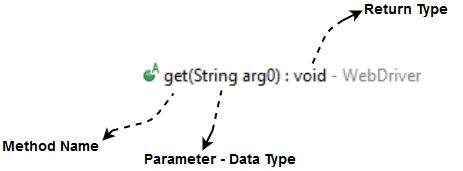
Method Name
To access any method of any class, we need to create an object of class and then all the public methods will appear for the object.
Parameter
A parameter is an argument which is passed to a method to perform some specific operation.
Return type
Methods can return a value or returning nothing (void). If the void is mentioned after the method, it means, the method is returning no value. If it is returning a value, then it must display the type of the value for e.g. getTitle(): String.
Now, we will discuss the various commands provided by WebDriver. The commands provided by Selenium WebDriver can be broadly classified in following categories:
- Browser Commands
- Navigation Commands
- WebElement Commands
Given below are some of the most commonly used Selenium commands in WebDriver:
1. Fetching a web page
There are two methods to fetch a web page:
- driver.get("www.javatpoint.com")
- driver.navigate().to("https://javatpoint.com/selenium-tutorial");
2. Locating forms and sending user inputs
- driver.findElement(By.id("lst-ib")).sendKeys("javatpoint tutorials");
3. Clearing User inputs
The clear() method is used to clear the user inputs from the text box.
- driver.findElement(By.name("q")).clear();
4. Fetching data over any web element
Sometimes we need to fetch the text written over a web element for performing some assertions and debugging. We use getText() method to fetch data written over any web element.
- driver.findElement(By.id("element567")).getText();
5. Performing Click event
The click() method is used to perform click operation on any web element.
- driver.findElement(By.id("btnK")).click();
6. Navigating backward in browser history
- driver.navigate().back();
7. Navigating forward in browser history
- driver.navigate().forward();
8. Refresh/ Reload a web page
- driver.navigate().refresh();
9. Closing Browser
10. Closing Browser and other all other windows associated with the driver
11. Moving between Windows
- driver.switchTo().window("windowName");
13. Moving between Frames
- driver.switchTo().frame("frameName");
14. Drag and Drop
Drag and Drop operation is performed using the Action class.
- WebElement element = driver.findElement(By.name("source"));
- WebElement target = driver.findElement(By.name("target"));
-
- (new Actions(driver)).dragAndDrop(element, target).perform();
Let us consider a sample test script which will cover most of the commonly used WebDriver commands.
For our test purpose, we are using a dummy web page under the URL:
https://www.testandquiz.com/selenium/testing.html
The default interface of the web page looks like this:
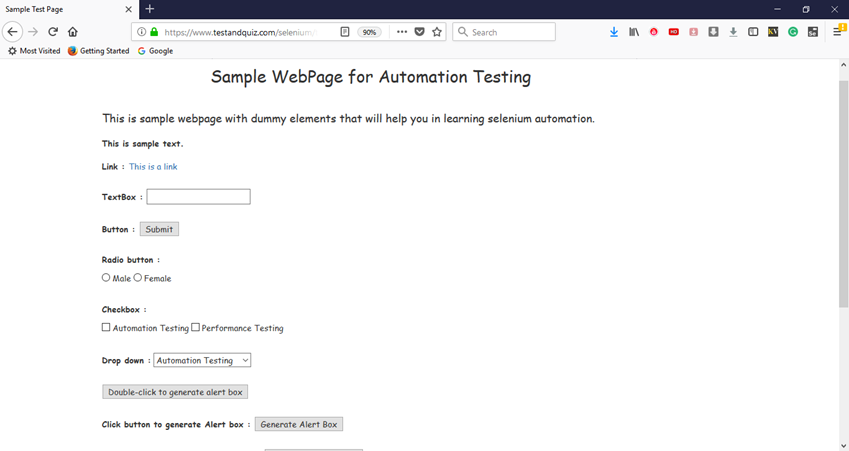
You can also use this dummy web page for your Selenium Testing practice.
First you need to download the browser driver for the browser on which you are willing to automate your test scenarios. We have already discussed execution of Selenium test scripts on different browsers in the previous sections of this tutorial.
For this test, we are using Firefox Gecko driver to automate our test scenarios on Firefox browser.
Below is the sample test script with embedded comments.
- import org.openqa.selenium.By;
- import org.openqa.selenium.WebDriver;
- import org.openqa.selenium.firefox.FirefoxDriver;
- import org.openqa.selenium.remote.DesiredCapabilities;
- import org.openqa.selenium.support.ui.Select;
-
- public class Second {
-
- public static void main(String[] args) {
-
-
- System.setProperty("webdriver.gecko.driver","D:\\GeckoDriver\\geckodriver.exe" );
-
-
- DesiredCapabilities capabilities = DesiredCapabilities.firefox();
- capabilities.setCapability("marionette",true);
- WebDriver driver= new FirefoxDriver(capabilities);
-
-
- driver.navigate().to("https://www.testandquiz.com/selenium/testing.html");
-
-
-
- String sampleText = driver.findElement(By.className("col-md-12")).getText();
- System.out.println(sampleText);
-
-
- driver.findElement(By.linkText("This is a link")).click();
-
-
- driver.findElement(By.id("fname")).sendKeys("JavaTpoint");
-
-
- driver.findElement(By.id("fname")).clear();
-
-
- driver.findElement(By.id("idOfButton")).click();
-
-
- driver.findElement(By.id("male")).click();
-
-
- driver.findElement(By.cssSelector("input.Automation")).click();
-
-
- Select dropdown = new Select(driver.findElement(By.id("testingDropdown")));
- dropdown.selectByVisibleText("Automation Testing");
-
-
- driver.close();
-
- }
-
- }
Selenium WebDriver- Running test on Chrome Browser
In this section, you will learn how to run your Selenium Test Scripts on Chrome Browser.
Chrome browser implements the WebDriver protocol using an executable called ChromeDriver.exe. This executable start a server on your system which in turn is responsible for running your test scripts in Selenium.
Let us consider a test case in which we will try to automate the following scenarios in Google Chrome browser.
- Launch Chrome browser.
- Maximize the browser.
- Open URL: www.javatpoint.com
- Scroll down through the web page
- Click on "Core Java" link from the Java Technology section.
We will create our third test case in the same test suite (Demo_Test).
Step1. Right click on the "src" folder and create a new Class File from New > Class.
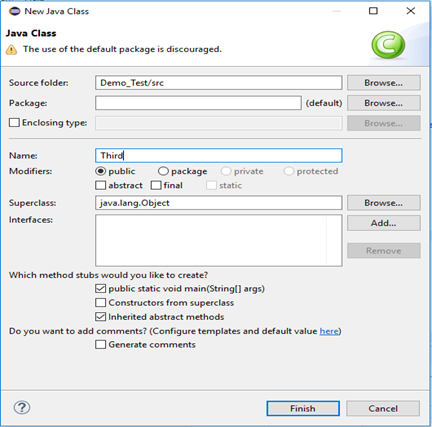
Give your Class name as "Third" and click on "Finish" button.
Step2. Open URL: https://sites.google.com/a/chromium.org/chromedriver/downloads in your browser.
Step3. Click on the "ChromeDriver 2.41" link. It will redirect you to the directory of ChromeDriver executables files. Download as per the operating system you are working currently on.

For windows, click on the "chromedriver_win32.zip" download.

The downloaded file would be in zipped format. Unpack the contents in a convenient directory.

Step4. Set a system property "webdriver.chrome.driver" to the path of your ChromeDriver.exe file and instantiate a ChromeDriver class.
Here is a sample code to do that.
-
- System.setProperty("webdriver.chrome.driver","D:\\ChromeDriver\\chromedriver.exe");
-
-
- WebDriver driver=new ChromeDriver();
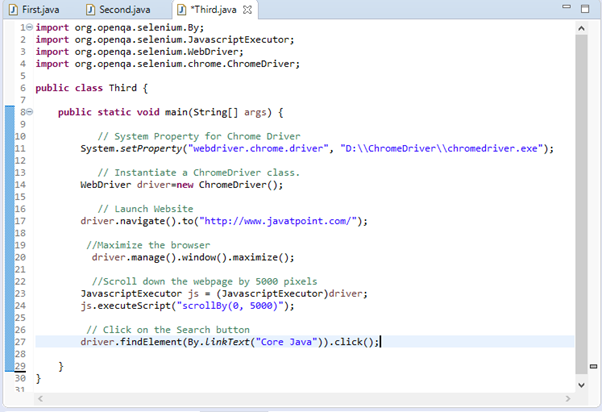
Step5. Now it is time to code. We have embedded comments for each block of code to explain the steps clearly.
- import org.openqa.selenium.By;
- import org.openqa.selenium.JavascriptExecutor;
- import org.openqa.selenium.WebDriver;
- import org.openqa.selenium.chrome.ChromeDriver;
-
- public class Third {
-
- public static void main(String[] args) {
-
-
- System.setProperty("webdriver.chrome.driver", "D:\\ChromeDriver\\chromedriver.exe");
-
-
- WebDriver driver=new ChromeDriver();
-
-
- driver.navigate().to("http://www.javatpoint.com/");
-
-
- driver.manage().window().maximize();
-
-
- JavascriptExecutor js = (JavascriptExecutor)driver;
- js.executeScript("scrollBy(0, 5000)");
-
-
- driver.findElement(By.linkText("Core Java")).click();
-
- }
-
- }
The Eclipse code window will look like this:
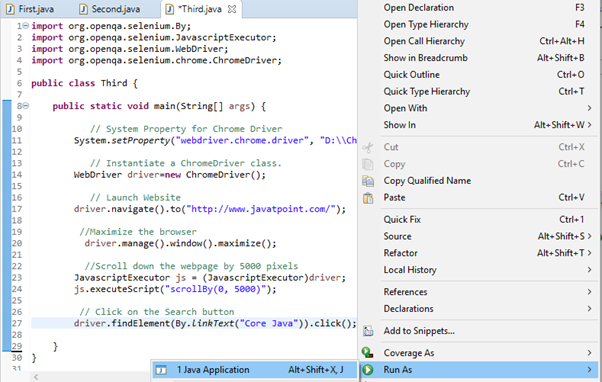
Step6. Right click on the Eclipse code and select Run As > Java Application.
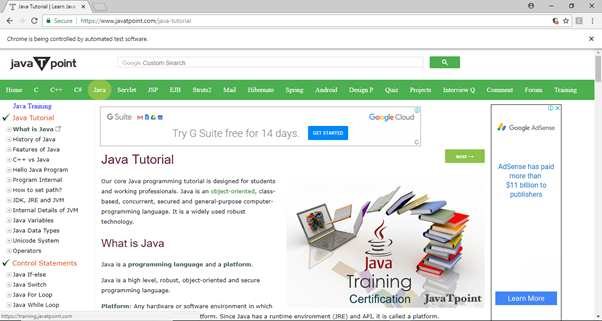
Step6. The output of above test script would be displayed in Chrome browser.
Selenium WebDriver- Running test on Firefox Browser- Gecko (Marionette) Driver
In this section, we will learn how to run your Selenium Test Scripts on Firefox Browser.
Before proceeding with this section, let us first understand the basics of Gecko Driver.
What is Gecko Driver?
The term Gecko refers to Gecko browser engine which was developed by Mozilla Foundation as a part of Mozilla browser.
Gecko Driver serves as a link between your tests in Selenium and the Firefox browser. It acts as a proxy between W3C WebDriver-compatible clients (Eclipse, Netbeans, etc.) to interact with Gecko-based browser (Mozilla Firefox).
Marionette (the next generation of FirefoxDriver) is turned on by default from Selenium 3. Selenium uses W3C Webdriver protocol to send requests to GeckoDriver, which translates them into a protocol named Marionette. Even if you are working with older versions of Firefox browser, Selenium 3 expects you to set path to the driver executable by the webdriver.gecko.driver.
Note: Selenium 3 has upgraded itself to now launch Firefox driver using Marionette driver instead of the default initialisation supported earlier.
Let us consider a test case in which we will try to automate the following scenarios in Firefox browser.
- Launch Firefox browser.
- Open URL: www.javatpoint.com
- Click on the Custom Search text box
- Type the value "Java"
- Click on the Search button.
We will create our second test case in the same test suite (Demo_Test).
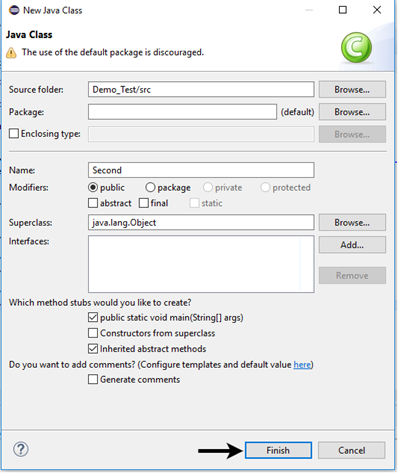
Step1. Right click on the "src" folder and create a new Class File from New > Class.
Give your Class name as "Second" and click on "Finish" button.

Step2. Open URL: https://github.com/mozilla/geckodriver/releases in your browser and click on the appropriate version for GeckoDriver download based on the operating system you are currently working on. Here, we are downloading the 64bit version of GeckoDriver for windows.
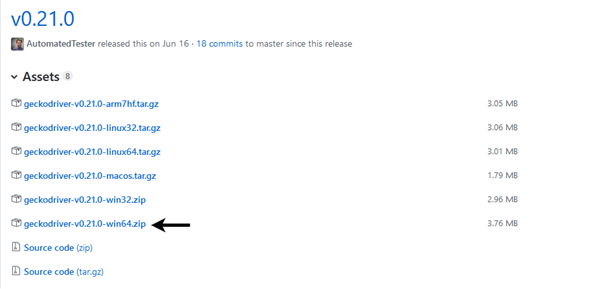
The downloaded file would be in zipped format. Unpack the contents in a convenient directory.

Before writing the test script, let us first understand how we can initialize GeckoDriver in Selenium. There are three ways to initialize GeckoDriver:
1. Using Desired Capabilities
First, we have to set the system property for Gecko Driver.
- System.setProperty("webdriver.gecko.driver","D:\\GeckoDriver\\geckodriver.exe" );
Below is the code to set gecko driver using DesiredCapabilities class.
- DesiredCapabilities capabilities = DesiredCapabilities.firefox();
- capabilities.setCapability("marionette",true);
Here is the complete code:
- System.setProperty("webdriver.gecko.driver","D:\\GeckoDriver\\geckodriver.exe" );
- DesiredCapabilities capabilities = DesiredCapabilities.firefox();
- capabilities.setCapability("marionette",true);
- WebDriver driver= new FirefoxDriver(capabilities);
2. Using marionette property:
Gecko Driver can also be initialized using marionette property.
- System.setProperty("webdriver.firefox.marionette","D:\\GeckoDriver\\geckodriver.exe");
The code for Desired Capabilities is not required for this method.
3. Using Firefox Options:
Firefox 47 or later versions have marionette driver as a legacy system. Thus, marionette driver can be called using Firefox Options as shown below.
- FirefoxOptions options = new FirefoxOptions();
- options.setLegacy(true);
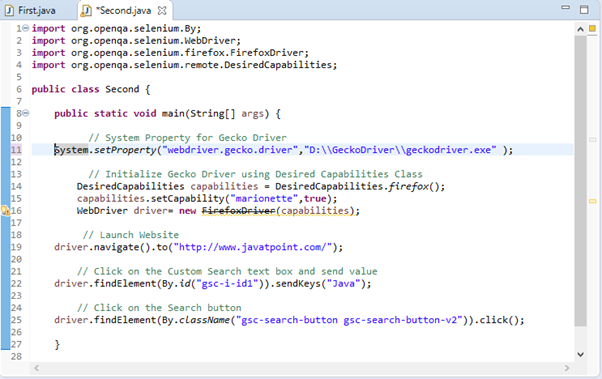
Step3. Now it is time to code. We have embedded comments for each block of code to explain the steps clearly.
- import org.openqa.selenium.By;
- import org.openqa.selenium.WebDriver;
- import org.openqa.selenium.firefox.FirefoxDriver;
- import org.openqa.selenium.remote.DesiredCapabilities;
-
- public class Second {
-
- public static void main(String[] args) {
-
-
- System.setProperty("webdriver.gecko.driver","D:\\GeckoDriver\\geckodriver.exe" );
-
-
- DesiredCapabilities capabilities = DesiredCapabilities.firefox();
- capabilities.setCapability("marionette",true);
- WebDriver driver= new FirefoxDriver(capabilities);
-
-
- driver.navigate().to("http://www.javatpoint.com/");
-
-
- driver.findElement(By.id("gsc-i-id1")).sendKeys("Java");
-
-
- driver.findElement(By.className("gsc-search-button gsc-search-buttonv2")).click();
- }
-
- }
The Eclipse code window will look like this:
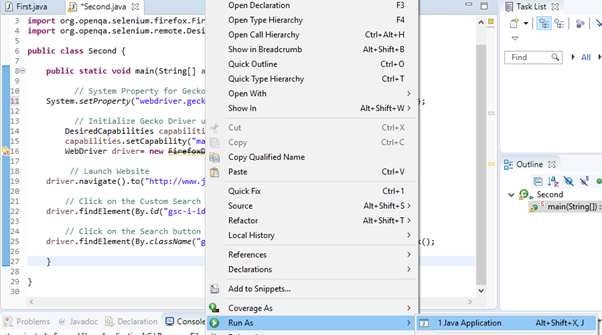
Step4. Right click on the Eclipse code and select Run As > Java Application.
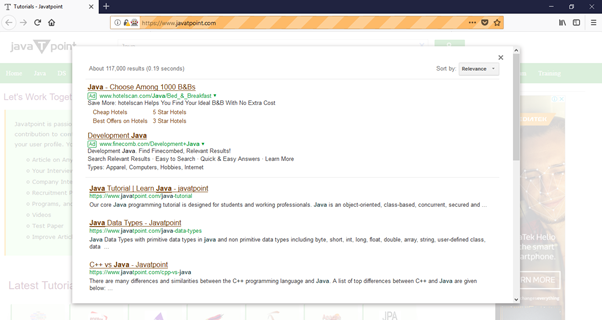
Step5. The output of above test script would be displayed in Firefox browser.
Selenium WebDriver- Running test on IE Browser
In this section, you will learn how to run your Selenium Test Scripts on IE Browser.
Internet Explorer implements the WebDriver protocol using Internet Explorer Driver Server. The Internet explorer Driver Server is the link between your tests in Selenium and the Internet Explorer Browser.
Let us consider a test case in which we will try to automate the following scenarios in IE browser.
We will create our fourth test case in the same test suite (Demo_Test).
Step1. Right click on the "src" folder and create a new Class File from New > Class. Give your Class name as "Fourth" and click on "Finish" button.

Step2. Open URL: http://selenium-release.storage.googleapis.com/index.html?path=2.48/ in your browser.
Step3. Choose the latest version and download as per the operating system you are currently working on.
For windows 64 bit, click on the "IEDriverServer x64 2.48.0 zip" download.
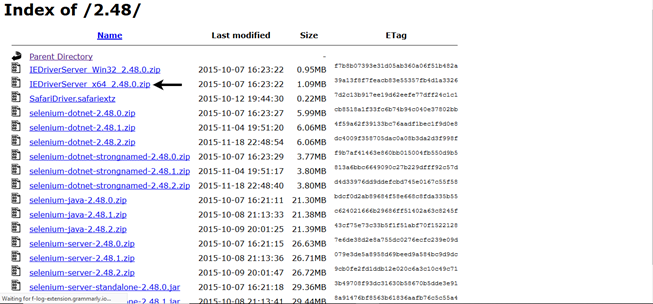
The downloaded file would be in zipped format. Unpack the contents in a convenient directory.

Step4. Set a system property "webdriver.ie.driver" to the path of your IEDriverServer.exe file and instantiate an IEDriver class.
Here is a sample code to do that.
-
- System.setProperty("webdriver.ie.driver", "D:\\IE Driver Server\\IEDriverServer.exe");
-
-
- WebDriver driver=new InternetExplorerDriver();
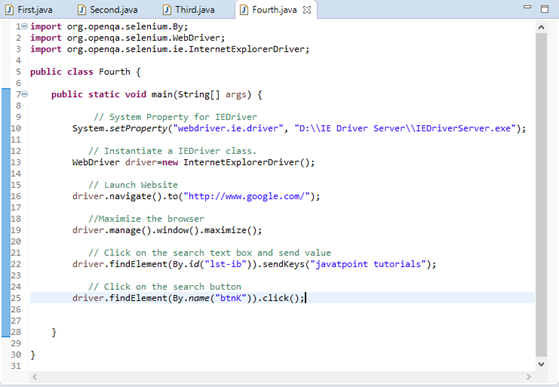
Step5. Now it is time to code. We have embedded comments for each block of code to explain the steps clearly.
- import org.openqa.selenium.By;
- import org.openqa.selenium.WebDriver;
- import org.openqa.selenium.ie.InternetExplorerDriver;
-
- public class Fourth {
-
- public static void main(String[] args) {
-
-
- System.setProperty("webdriver.ie.driver", "D:\\IE Driver Server\\IEDriverServer.exe");
-
-
- WebDriver driver=new InternetExplorerDriver();
-
-
- driver.navigate().to("http://www.google.com/");
-
-
- driver.manage().window().maximize();
-
-
- driver.findElement(By.id("lst-ib")).sendKeys("javatpoint tutorials");
-
-
- driver.findElement(By.name("btnK")).click();
-
-
- }
-
- }
The Eclipse code window will look like this:
Step6. Right click on the Eclipse code and select Run As > Java Application.
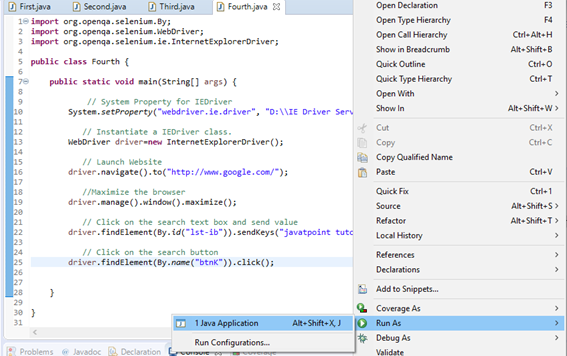
Step6. The output of above test script would be displayed in Internet Explorer browser.
Selenium WebDriver- Running test on Safari Browser
In this section, we will learn how to run our Selenium Test Scripts on Safari Browser.
Safari Browser implements the WebDriver protocol using SafariDriver. The SafariDriver is the link between your tests in Selenium and the Safari Browser. SafariDriver has been implemented as a plugin in safari browser and this provides a perfect match of client and server machine where SafariDriverServer acts as server and Selenium-Java/Language binding acts as client.
Note: Previously SafariDriver was supporting safari browser on Windows machine but recently Apple has decided to remove its support for windows and then execution on safari has become the job of Mac machine. So for the same, we need mac machine where safari browser should be installed.
Let us consider a test case in which we will try to automate the following scenarios in Safari browser.
- Launch Safari browser.
- Open URL: www.google.com
- Type the value "javatpoint tutorials"
- Click on the Search button.
- Close the browser
We will create our fifth test case in the same test suite (Demo_Test).
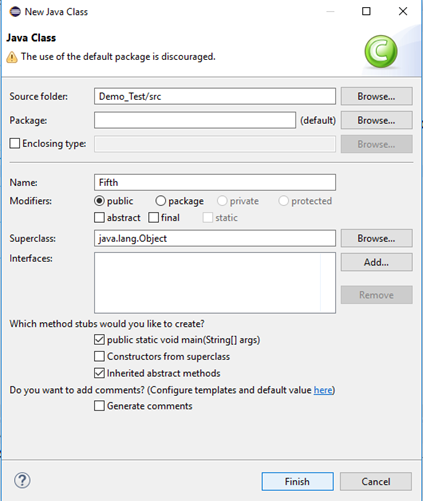
Step1. Right click on the "src" folder and create a new Class File from New > Class. Give your Class name as "Fifth" and click on "Finish" button.

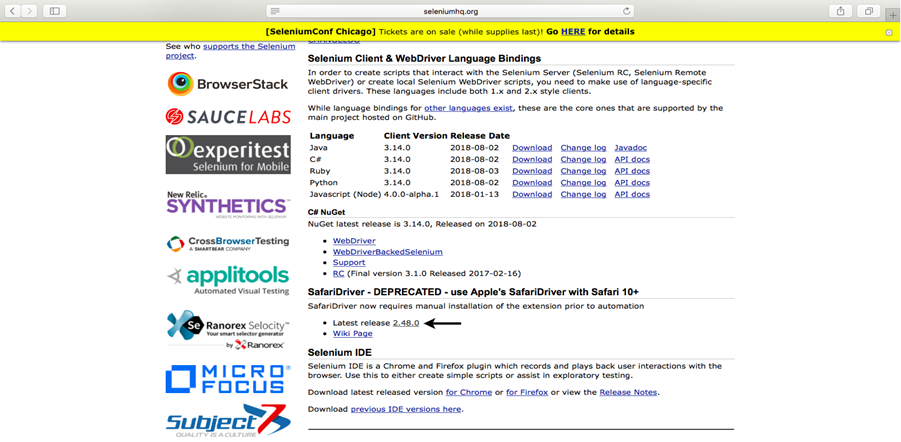
Step2. Open URL: https://www.seleniumhq.org/download/ in your Safari browser. It will direct you to the 'downloads' page of Selenium official website. Scroll down through the web page and locate SafariDriver.
Step3. Click on the "Latest Release" option to download the latest version of SafariDriver.
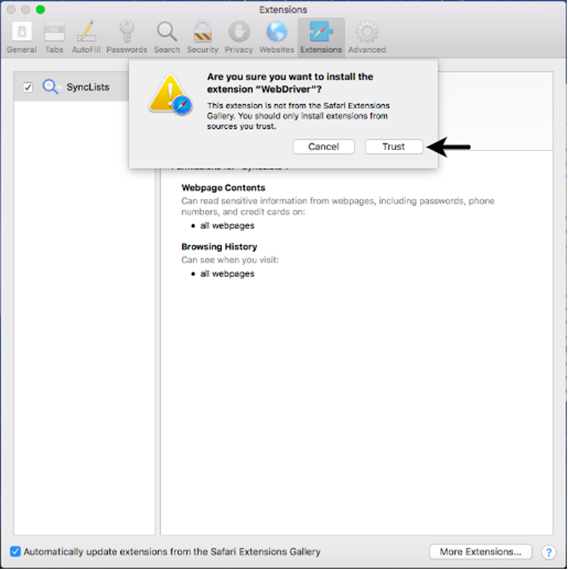
Step4. Double click on the downloaded file.

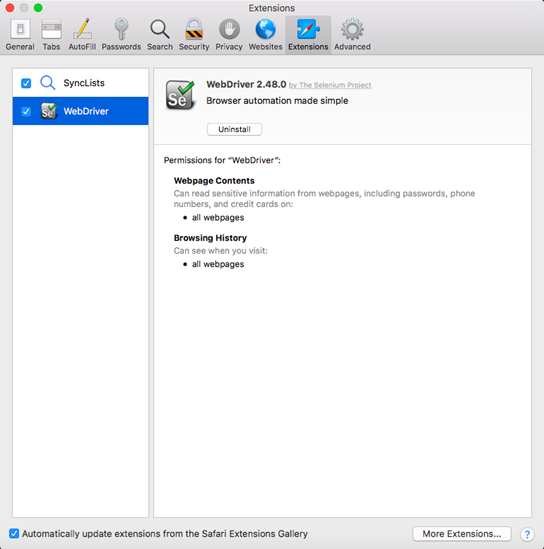
This will launch a pop-up box on your Safari browser extension window. Click on the "Trust" button to configure WebDriver in your Safari browser.
Step5. Restart your browser.
Before writing the test script, let us first understand how we can initialize SafariDriver in Selenium. Safari browser is represented by a class called SafariDriver in the org.openqa.selenium.safari package. All we have to do is to create an instance of SafariDriver class.
Here is a sample code to do that:
- WebDriver driver = new SafariDriver();
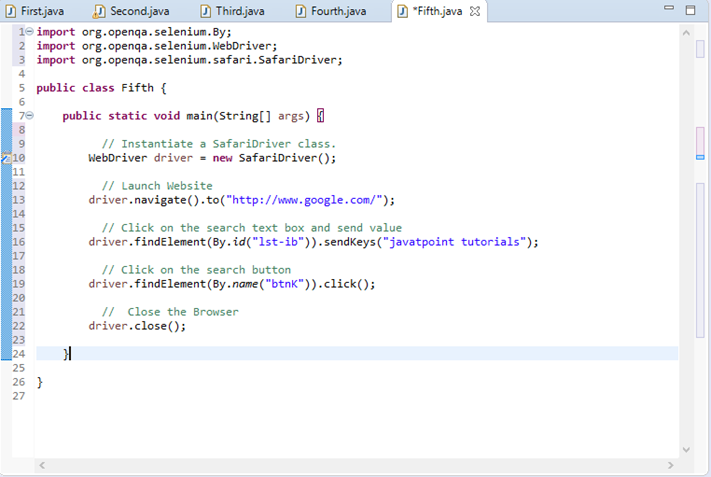
Step6. Now, it is time to code. We have embedded comments for each block of code to explain the steps clearly.
- import org.openqa.selenium.By;
- import org.openqa.selenium.WebDriver;
- import org.openqa.selenium.safari.SafariDriver;
-
- public class Fifth {
-
- public static void main(String[] args) {
-
-
- WebDriver driver = new SafariDriver();
-
-
- driver.navigate().to("http://www.google.com/");
-
-
- driver.findElement(By.id("lst-ib")).sendKeys("javatpoint tutorials");
-
-
- driver.findElement(By.name("btnK")).click();
-
-
- driver.close();
-
- }
The Eclipse code window will look like this:
Step7. Right click on the Eclipse code and select Run As > Java Application.
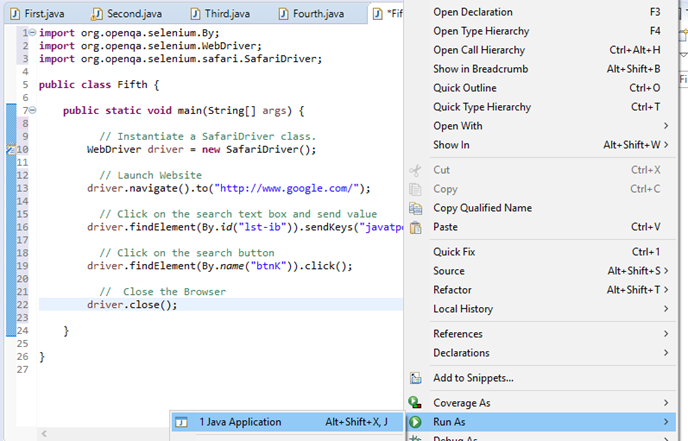
Upon execution, the above test script will launch the Safari browser and automate all the test scenarios.